These days, Android is definitely the most popular and dominated OS on Smartphones and tablets. The Android version 4.3 Jelly Bean is available on a bunch of high end Android Smartphones like Samsung Galaxy S3, Sony Xpreia ZL etc.
For the Smartphones which didn't get any update to 4.3 JellyBean on your phone can be processed is by rooting it and installing a custom Android 4.3 ROM. But again Android 4.3 wont run on most low end android phones and even there are no Custom Roms for low end Android Devices.
But its not only Smartphones which can run Android Operating System . How about installing and using Android 4.3 on your Personal Computer or Laptop from a Windows Virtual machine?
Amazed?
Here are the ways to install and work Android 4.3 JellyBean on your PC or Laptop.
Android 4.3 can be installed and run on a windows computer running Windows XP, Windows Vista , Windows 7 or Windows 8, by courtesy of Android-x86, an unofficial initiative to port Google’s Android mobile operating system to run on devices powered by Intel and AMD x86 processors.
Before starting in to the process, we must have the following downloads and Requirements
1) Oracle Virtualbox
2) The latest Android 4.3 JellyBean image from Android-X86 project.
3) 2 GB Ram, 10 GB HardDisk free space
Now android 4.3 is successfully installed on your virtual machine. Select Run Android 4.3 and press Enter. Click OK for any other dialog boxes that appear. You will now see the android loading screen.
Select your language and enter, now fill in the Gmail details and all the details asked.
Now We have successfully installed Android 4.3 on your windows computer.
For the Smartphones which didn't get any update to 4.3 JellyBean on your phone can be processed is by rooting it and installing a custom Android 4.3 ROM. But again Android 4.3 wont run on most low end android phones and even there are no Custom Roms for low end Android Devices.
But its not only Smartphones which can run Android Operating System . How about installing and using Android 4.3 on your Personal Computer or Laptop from a Windows Virtual machine?
Amazed?
Here are the ways to install and work Android 4.3 JellyBean on your PC or Laptop.
Android 4.3 can be installed and run on a windows computer running Windows XP, Windows Vista , Windows 7 or Windows 8, by courtesy of Android-x86, an unofficial initiative to port Google’s Android mobile operating system to run on devices powered by Intel and AMD x86 processors.
Before starting in to the process, we must have the following downloads and Requirements
1) Oracle Virtualbox
2) The latest Android 4.3 JellyBean image from Android-X86 project.
3) 2 GB Ram, 10 GB HardDisk free space
Step 1: Install and open Virtualbox.
Step 2: Click on new and enter a name and the operating system details
Enter a name and the operating system details for the virtual machine. Select type as Linux and version as other and click next.
Step 3: Enter the amount of ram
You would like to allot for the virtual machine and click next. Android 4.3 requires at least 1 Gb of RAM but its not necessary.
Step 4: Create a virtual hard disk
In the next window select “ Create a virtual hard disk “ and then select VDI.Step 5: Select Dynamically Allocated or Fixed Size for Storage Space
In the next window , According to your space requirement you can either select dynamically allocated or fixed size for your storage space. In the next dialog box set the Storage Space for Android according to your requirement.Step 6: Add the location of the Android 4.3 Image File.
Your Virtual machine is now set. All you need to do is add the location of the Android 4.3 Image File. Click on the settings button in VirtualBox. Under the settings navigate to storage, below the storage tree select empty and click on the disk image and select “choose a virtual CD/DVD disk file" and select the Android 4.3 Image. Check the Live CD/DVD box and Click OK.Step 7: Install Android-X86 to hard disk
Double click on your virtual machine to start it and click OK for all the dialog boxes. Select Install Android-X86 to hard disk and click OK for all the dialog boxes.Step 8: Create a partition for installing Android
In the next window you have to create a partition for installing Android. The new partition will not mess up anything with your windows computer. From now onwards you have to use your up, down, left and right keys on your keyboard to Select “create/modify partitions “ and click OK.Step 9: Specify the size
In the next windows select new > primary and then specify the size of the new partition.Step 10: Select write and press enter and type “yes “ and press enter
Your new partition has been created. Select write and press Enter and type “yes “ and press enter again when prompted. In the next window select quit and press Enter.Step 11 : Select the Sda1
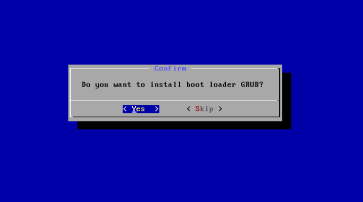
In the next window select the Sda1 and press enter . select the et3 file system and press Enter. When prompted to install grub loader select Yes. Select now when prompted to make your system directory as read-writeStep 12: Select Run Android 4.3
Now android 4.3 is successfully installed on your virtual machine. Select Run Android 4.3 and press Enter. Click OK for any other dialog boxes that appear. You will now see the android loading screen.
Step 13: Select your language
Select your language and enter, now fill in the Gmail details and all the details asked.
Now We have successfully installed Android 4.3 on your windows computer.


0 comments: