Showing posts with label Android and PC. Show all posts

Friday, 12 December 2014

Create a WiFi hotspot in Windows 7,8 & Share Internet connection for use in smartphones


Also Read Lenovo K3 Budget Smartphone Launched as Xiaomi Redmi 1S Competitor

Nowadays, almost all cell phones have an inbuilt WiFi adapter. And also, Android OS is much popular these days. Thus most of us have an Android phone with latest WiFi technology, may be 802.11 b/g/n. As almost all PC’s today are equipped with a WiFi adapter and almost every computer OS provides the feature of creating a Wireless Connection, one may think of creating one and share the internet connection for use in Android. But it is of no use, as Android is unable to detect “ad-hoc” wireless networks and it needs an “infrastructure network”. Its well enough if you have a wireless router as its somewhat not possible to create an “infrastructure network” using PC’s WiFi.
But, here comes the twist. The line you read just 2 seconds ago is wrong. Yeah, one can create a Wireless Network using PC’s WiFi for use in Android (Under some conditions!). This guide features a complete tutorial on creating a Wireless Connection in Windows (detectable by Android) and sharing your Internet Connection over WiFi.

Before continuing with this tutorial, I recommend you to download mHotspot. Its required for creating an infrastructure network (A Hotspot!). Also, let me assure, that this software works only in Windows 7 and above. Thus, XP users have to find some other solution as we cannot continue without this application. Sorry for that !! So, lets begin.

First of all, we need to share our working Internet Connection with the WiFi adapter. For doing so, proceed as follows.

Open “Network and Sharing Center”. From the left pane, click on “Change adapter settings”.
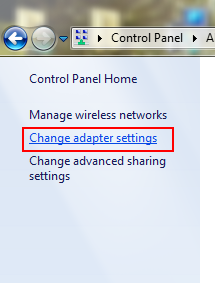
This will list all your network adapters and connections. Now right-click on your current, working Internet Connection and select “Properties”.
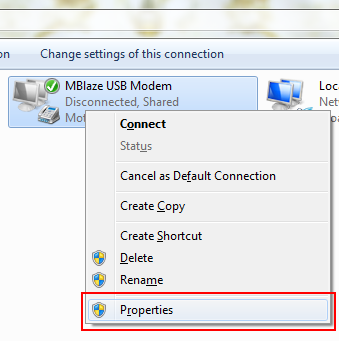
A dialog box will be opened as shown in the image. Go to the sharing tab. Check the option“Allow other network users to connect through this computer’s Internet connection“. If it is already checked, uncheck and check it again. Now, from the dropdown under the label“Home networking connection”, select “Wireless Network Connection 2″ from the list.

Also Read Moto E (Gen 2) With 4.5-Inch Display and 4G LTE Tipped to Launch Soon
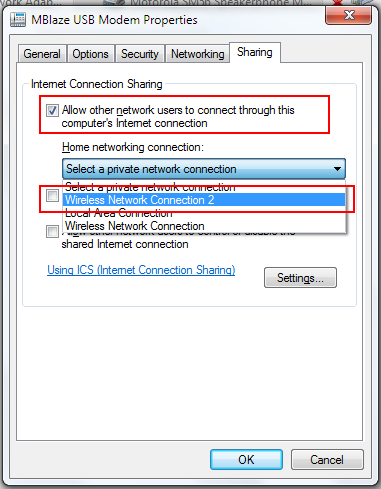
In most PC’s its name is “Wireless Network Connection 2″ by default, unless changed. If you can not find it in the list, just search for your “Microsoft Virtual WiFi Miniport Adapter” and select its name from the list. Then, click on “OK”. If prompted about some IP Address settings, just click “OK” and proceed further.
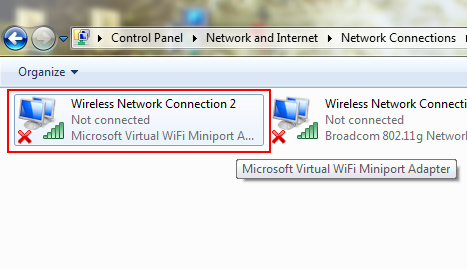
Now, open Properties of that “Wireless Network Connection 2″ (Microsoft Virtual WiFi Miniport Adapter). Double-click on “Internet Protocol Version 4 (TCP/IPv4)”.
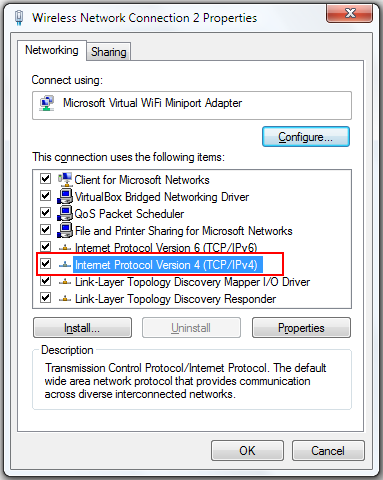
It will open up another Properties window. Here, select the option “Use the following IP adress”. Set the “IP address” to 192.168.0.1, the “Subnet mask” to 255.255.255.0 and leave the “Default gateway” blank. Also, set 8.8.8.8 as the “Preferred DNS server”. Leave“Alternate DNS server”, blank. Click “OK” and also close other Properties window. Thus, we have shared our Internet connection. Then, connect to the Internet connection.
Now, we proceed towards creating a WiFi hotspot. For that double-click on “mHotspot.exe” that we downloaded a the beginning of this tutorial. Then, click on “SETUP HOTSPOT”.
Give the desired name and a password (minimum 8 characters). Make sure you provide a strong password (I recommend that the password should contain alphanumeric characters with atleast one uppercase letter and one special character like for example: “Ggsr@143″). After that, click on“OK”.

Also Read Motorola India Claims to Have Sold 2.5 Million Smartphones This Year
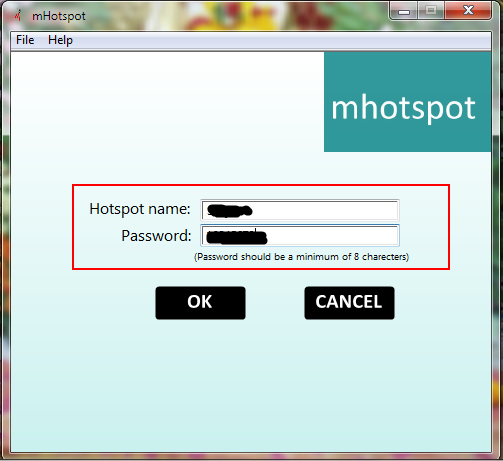

Now click on the “START” button.
Now, click on the network icon in the taskbar and check whether the name of the newly created WiFi hotspot appears or not. If the name is listed, means we have successfully configured our hotspot.
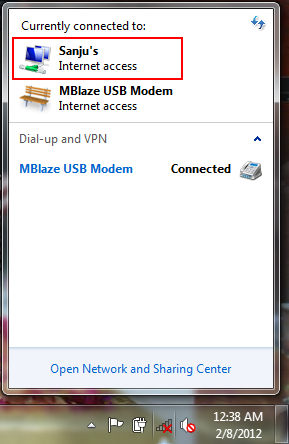
It will show “Internet access” under the name of your current Internet connection and also under the name of our recently created WiFi hotspot. If “No internet access” is mentioned under the name of your current Internet connection, means you are not yet connected to the internet. While, if“Internet access” is mentioned under your current connection but “No internet access” is mentioned under the name of the hotspot, means the Internet connection is not properly shared. Just repeat the previous steps for sharing the Internet connection properly. If all set, then its time to configure the Android device.
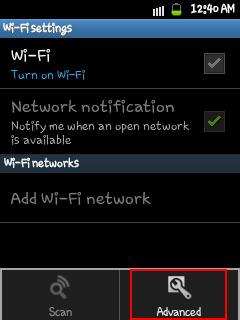
Below here, I have mentioned steps for the Android device running Android v2.3.6 (Gingerbread). Though, the steps are somewhat similar for other versions. So, just go toSettings -> Wireless and networks -> Wi-Fi settings. Now open menu and select“Advanced” option.
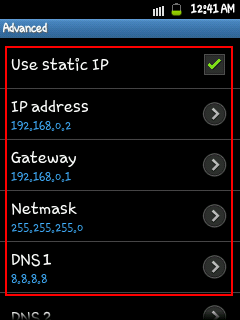
Here, check the option “Use static IP”. Set the “IP address” to 192.168.0.2, “Gateway” to192.168.0.1, “Netmask” to 255.255.255.0 and “DNS1″ to 8.8.8.8 and leave “DNS2″ blank. Now save the settings and turn the Wi-Fi on.
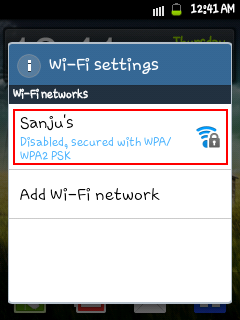
It will detect and display the name of our hotspot in the available networks list. Select the network, enter the password and tap on Connect. If you are authenticated correctly, your cell phone will be connected to the hotspot.
That’s it. You can now use the Internet on your device.
I have basically shown the steps for Android but, these can be done the same way in other devices. One just needs to know how to configure the IP settings in that device. This hotspot is detectable in almost every WiFi enabled device. Thus it can be used to share an Internet connection between PC’s too.
Happy and Safe Browsing !!


Also Read Google India's Great Online Shopping Festival (GOSF) Kicks Off Wednesday

NOTE: Feel Free To Comment....
Unknown  /  at  01:00  /  No comments


Also Read Lenovo K3 Budget Smartphone Launched as Xiaomi Redmi 1S Competitor

Nowadays, almost all cell phones have an inbuilt WiFi adapter. And also, Android OS is much popular these days. Thus most of us have an Android phone with latest WiFi technology, may be 802.11 b/g/n. As almost all PC’s today are equipped with a WiFi adapter and almost every computer OS provides the feature of creating a Wireless Connection, one may think of creating one and share the internet connection for use in Android. But it is of no use, as Android is unable to detect “ad-hoc” wireless networks and it needs an “infrastructure network”. Its well enough if you have a wireless router as its somewhat not possible to create an “infrastructure network” using PC’s WiFi.
But, here comes the twist. The line you read just 2 seconds ago is wrong. Yeah, one can create a Wireless Network using PC’s WiFi for use in Android (Under some conditions!). This guide features a complete tutorial on creating a Wireless Connection in Windows (detectable by Android) and sharing your Internet Connection over WiFi.

Before continuing with this tutorial, I recommend you to download mHotspot. Its required for creating an infrastructure network (A Hotspot!). Also, let me assure, that this software works only in Windows 7 and above. Thus, XP users have to find some other solution as we cannot continue without this application. Sorry for that !! So, lets begin.

First of all, we need to share our working Internet Connection with the WiFi adapter. For doing so, proceed as follows.

Open “Network and Sharing Center”. From the left pane, click on “Change adapter settings”.
This will list all your network adapters and connections. Now right-click on your current, working Internet Connection and select “Properties”.
A dialog box will be opened as shown in the image. Go to the sharing tab. Check the option“Allow other network users to connect through this computer’s Internet connection“. If it is already checked, uncheck and check it again. Now, from the dropdown under the label“Home networking connection”, select “Wireless Network Connection 2″ from the list.

Also Read Moto E (Gen 2) With 4.5-Inch Display and 4G LTE Tipped to Launch Soon

In most PC’s its name is “Wireless Network Connection 2″ by default, unless changed. If you can not find it in the list, just search for your “Microsoft Virtual WiFi Miniport Adapter” and select its name from the list. Then, click on “OK”. If prompted about some IP Address settings, just click “OK” and proceed further.
Now, open Properties of that “Wireless Network Connection 2″ (Microsoft Virtual WiFi Miniport Adapter). Double-click on “Internet Protocol Version 4 (TCP/IPv4)”.
It will open up another Properties window. Here, select the option “Use the following IP adress”. Set the “IP address” to 192.168.0.1, the “Subnet mask” to 255.255.255.0 and leave the “Default gateway” blank. Also, set 8.8.8.8 as the “Preferred DNS server”. Leave“Alternate DNS server”, blank. Click “OK” and also close other Properties window. Thus, we have shared our Internet connection. Then, connect to the Internet connection.
Now, we proceed towards creating a WiFi hotspot. For that double-click on “mHotspot.exe” that we downloaded a the beginning of this tutorial. Then, click on “SETUP HOTSPOT”.
Give the desired name and a password (minimum 8 characters). Make sure you provide a strong password (I recommend that the password should contain alphanumeric characters with atleast one uppercase letter and one special character like for example: “Ggsr@143″). After that, click on“OK”.

Also Read Motorola India Claims to Have Sold 2.5 Million Smartphones This Year


Now click on the “START” button.
Now, click on the network icon in the taskbar and check whether the name of the newly created WiFi hotspot appears or not. If the name is listed, means we have successfully configured our hotspot.
It will show “Internet access” under the name of your current Internet connection and also under the name of our recently created WiFi hotspot. If “No internet access” is mentioned under the name of your current Internet connection, means you are not yet connected to the internet. While, if“Internet access” is mentioned under your current connection but “No internet access” is mentioned under the name of the hotspot, means the Internet connection is not properly shared. Just repeat the previous steps for sharing the Internet connection properly. If all set, then its time to configure the Android device.
Below here, I have mentioned steps for the Android device running Android v2.3.6 (Gingerbread). Though, the steps are somewhat similar for other versions. So, just go toSettings -> Wireless and networks -> Wi-Fi settings. Now open menu and select“Advanced” option.
Here, check the option “Use static IP”. Set the “IP address” to 192.168.0.2, “Gateway” to192.168.0.1, “Netmask” to 255.255.255.0 and “DNS1″ to 8.8.8.8 and leave “DNS2″ blank. Now save the settings and turn the Wi-Fi on.

It will detect and display the name of our hotspot in the available networks list. Select the network, enter the password and tap on Connect. If you are authenticated correctly, your cell phone will be connected to the hotspot.
That’s it. You can now use the Internet on your device.
I have basically shown the steps for Android but, these can be done the same way in other devices. One just needs to know how to configure the IP settings in that device. This hotspot is detectable in almost every WiFi enabled device. Thus it can be used to share an Internet connection between PC’s too.
Happy and Safe Browsing !!


Also Read Google India's Great Online Shopping Festival (GOSF) Kicks Off Wednesday

NOTE: Feel Free To Comment....

Posted in: , , Read Complete Article»

Saturday, 11 October 2014

Hands-on with HTC’s RE action camera and Desire Eye smartphone

re-2

Also Read Apple Sends Invitations for October 16 Special Event: "It's Been Way Too Long"

HTC announced two image-focused products at its Double Exposure event on Wednesday: the RE action camera and the selfie-taking Desire Eye phone. Here are our hands-on impressions with the devices.

RE

re 1 730x433 Hands on with HTC’s RE action camera and Desire Eye smartphone
The camera ends up compromising wearability in favor of ergonomics. The RE armband looked positively awkward on the event models, as if they had strapped a water pick on their arms while going out for a jog. The form factor also makes it less suitable for strapping to your head since it’s so long.
HTC has positioned the device as a mainstream alternative to the GoPro, and that’s a wise move. Of course, the fact that the Flip failed should serve as a cautionary tale for RE.
RE has two options for video recording: 1080p or 720p. Still photos can be taken in three resolutions: 16MP, 12MP and ~8MP. The camera has a normalize feature that mitigates the wide-angle distortion from the fisheye lens, or you can simply elect to turn the wide-angle mode off.
HTC had an array of accessories on display for the RE, including a hat band, suction mounts and lanyards.
re accessories 730x616 Hands on with HTC’s RE action camera and Desire Eye smartphone
The camera uses Bluetooth LE to establish the initial connection with your phone. From there, you can use Wi-Fi Direct to transfer photos. RE will also tap into Wi-Fi networks on its own to transfer content to the cloud if you so choose. In order to use the timelapse feature on the RE, you’ll need to trigger it via the iOS or Android app.

Also Read Full Specifications Of BlackBerry Passport

The image quality is good, but not stunning. As Wednesday’s event showed, HTC is continuing to differentiate itself through interesting mobile photo use cases, such as RE and its new Zoe app. RE is a fun, casual device.

Desire Eye

If we’re all stuck taking selfies, we might as well take better ones. Desire Eye offers a dramatic improvement to your front-facing shots with its 13MP camera and dual-LED flash.
desire eye 2 220x372 Hands on with HTC’s RE action camera and Desire Eye smartphoneNormally a front-camera shot in those conditions would be extremely noisy, but the Desire Eye handled it well.
One concern is that HTC’s custom Eye Experience software is that these new features, while neat, are adding unnecessary complexity to the camera app. For instance, it’s not clear which of the new tools, such as the button-free “selfie mode,” needed to be toggled on.
The crop-and-scale feature to be gimmicky. It felt more like the kind of option you’d find in a photo sticker booth, as opposed to a handset.
There’s certainly a time and a place for advanced camera controls, but considering that the Desire line is meant to be mainstream, and the selfie features would appeal to nontechnical users, HTC is going to need to solve a UI issue here. Otherwise, new camera features will get buried and the phone’s unique selling points will be neglected.
The phone’s hardware design is fairly nondescript. Maybe it was the orange trim, but the device reminded me some of Xiaomi.


Also Read On the Xbox One you can have next-gen graphics or next-gen gameplay – not both

NOTE: Feel Free To Comment....
Unknown  /  at  14:02  /  No comments

re-2

Also Read Apple Sends Invitations for October 16 Special Event: "It's Been Way Too Long"

HTC announced two image-focused products at its Double Exposure event on Wednesday: the RE action camera and the selfie-taking Desire Eye phone. Here are our hands-on impressions with the devices.

RE

re 1 730x433 Hands on with HTC’s RE action camera and Desire Eye smartphone
The camera ends up compromising wearability in favor of ergonomics. The RE armband looked positively awkward on the event models, as if they had strapped a water pick on their arms while going out for a jog. The form factor also makes it less suitable for strapping to your head since it’s so long.
HTC has positioned the device as a mainstream alternative to the GoPro, and that’s a wise move. Of course, the fact that the Flip failed should serve as a cautionary tale for RE.
RE has two options for video recording: 1080p or 720p. Still photos can be taken in three resolutions: 16MP, 12MP and ~8MP. The camera has a normalize feature that mitigates the wide-angle distortion from the fisheye lens, or you can simply elect to turn the wide-angle mode off.
HTC had an array of accessories on display for the RE, including a hat band, suction mounts and lanyards.
re accessories 730x616 Hands on with HTC’s RE action camera and Desire Eye smartphone
The camera uses Bluetooth LE to establish the initial connection with your phone. From there, you can use Wi-Fi Direct to transfer photos. RE will also tap into Wi-Fi networks on its own to transfer content to the cloud if you so choose. In order to use the timelapse feature on the RE, you’ll need to trigger it via the iOS or Android app.

Also Read Full Specifications Of BlackBerry Passport

The image quality is good, but not stunning. As Wednesday’s event showed, HTC is continuing to differentiate itself through interesting mobile photo use cases, such as RE and its new Zoe app. RE is a fun, casual device.

Desire Eye

If we’re all stuck taking selfies, we might as well take better ones. Desire Eye offers a dramatic improvement to your front-facing shots with its 13MP camera and dual-LED flash.
desire eye 2 220x372 Hands on with HTC’s RE action camera and Desire Eye smartphoneNormally a front-camera shot in those conditions would be extremely noisy, but the Desire Eye handled it well.
One concern is that HTC’s custom Eye Experience software is that these new features, while neat, are adding unnecessary complexity to the camera app. For instance, it’s not clear which of the new tools, such as the button-free “selfie mode,” needed to be toggled on.
The crop-and-scale feature to be gimmicky. It felt more like the kind of option you’d find in a photo sticker booth, as opposed to a handset.
There’s certainly a time and a place for advanced camera controls, but considering that the Desire line is meant to be mainstream, and the selfie features would appeal to nontechnical users, HTC is going to need to solve a UI issue here. Otherwise, new camera features will get buried and the phone’s unique selling points will be neglected.
The phone’s hardware design is fairly nondescript. Maybe it was the orange trim, but the device reminded me some of Xiaomi.


Also Read On the Xbox One you can have next-gen graphics or next-gen gameplay – not both

NOTE: Feel Free To Comment....

Posted in: , , Read Complete Article»

Thursday, 11 September 2014

How to Edit PDF Files for Free on (Almost) Any Platform?

pdf_format_wikipedia.jpg

Also Read Apple Unveils 'Apple Pay' Mobile Wallet and Payment System

Ever received a pdf file as an attachment, and wondered how to append your signature without printing it out and scanning the final copy? Or how to fix that one typo before sending it back? Of course you have.
The pdf or Portable Document Format is a popular file format that lets you view documents across platforms without disturbing its formatting. PDF files, which often house comics, novels and various bills, aren't meant to be edited. That's why it is hard to find a one-size-fits-all pdf editing solution for free. But it can be very inconvenient when you need to fill a form or add a line to a document which was sent as a pdf.
While Adobe Acrobat XI (Rs 30,000) and Nitro PDF Editor (Rs 11,000) are good apps, their cost is prohibitive for most people. Luckily, there are free alternatives on most devices now. Read on to find out how to edit pdf files without spending a dime.
On the Web (Works on Android, BlackBerry 10)

If you don't have a Windows or a Mac machine, or if you don't want to install any applications, head to PDF Buddy for basic editing tools. This website also works for editing pdf files on an Android phone, but not on iOS devices. In case you want to try the website first, PDF Buddy lets you use basic features (adding shapes, symbols, text, whiteout and highlight) without creating an account. You will have to create an account if you want to do anything useful like save or download the edited file, add images or signatures to the pdf file. You can edit up to three pdf files a month for free. The website asks you to pay $8 (roughly Rs 500) per month to let you edit an unlimited number of files.
Ease of use is PDF Buddy's strength, but it may not be the best tool for power users. Text editing options are limited to two fonts and you'll have to manually place text so that it aligns with the rest of the line. However, this may not be a limitation for those who just want to fill out forms without printing the document. PDF Buddy also lets you merge, split and share pdf files. Here is how to use it:
1. Drag a pdf file into the browser or click the Choose PDF to Edit button on the website and then select the file you want to edit.
2. Now, PDF Buddy will open the file (might take long for large files). Once it opens, you'll see a set of editing tools on the left side of the file.
3. The editing tools are fairly straightforward, since the name of each tool tells you what it does. You can choose the text tool to edit text and whiteout tool to erase text. Note that only two fonts are supported (Arial and Times). You can also highlight text, add images and signatures, using the corresponding tools.
4. Below the tools mentioned above, PDF Buddy has shapes and symbols, which you can add to your file. You can use symbols such as "thumbs up", "thumbs down" and "arrows" as bullet points or for annotations if needed.
5. Above the pdf file, you'll see arrows pointing to the right and left. Use these to move to the next or previous page.
6. When you finish editing, hit the Save button at the top of the page. This will save a copy of the file on the website. If you want to save it on your computer, click theDownload button that's next to the Save button.
Also Read iPhone 6 and iPhone 6 Plus Available in India October 17; Price Unknown
PDF_Buddy_Edit_635.jpg
For desktops and laptops

For those who use Windows, Mac or Linux, LibreOffice Draw may be the best programme for editing text in pdf files. LibreOffice is a full office suite and you'll have to download the setup file for the whole suite to use Draw. Fortunately, during installation the programme lets you select the software you want to install. This means that you can install Draw without installing all the other apps in the office suite. Like PDF Buddy, Draw is easy to use. Follow these steps and you should be able to edit pdf files easily. Note that these steps are for the Windows version of Draw, but the process is similar for Mac and Linux.
1. LibreOffice Draw can open pdf files without any configuration. All you have to do is press Ctrl+O or click File > Open, and select your pdf file.
2. All the tools are laid out at the bottom and should be familiar to anyone who has used MS Word. Click on the line you need to start editing and get to work.
3. Before you get to editing, note that LibreOffice Draw can make formatting go haywire. We imported a pdf file with bullet points, symbols and underlines. Draw moved all of these and it took us a lot of time to restore these to their original positions.
4. To align various elements, just click and drag to move them.
5. As long as your system has the font used in the pdf file, text editing is fairly easy. All you need to do is select the text you want to edit and start typing. Each line of text, bullet point, underline, etc. appear as an object in Draw.
6. When you finish editing, select the Export as PDF option in the File menu.
LibreOffice_Draw_635.jpg
Using a word processing app
Another way to edit pdf files is to convert them to a more edit-friendly file format. Websites such as PDFtoword or PDFonline. PDFtoword also lets you convert pdf files to Excel and Powerpoint formats. This lets you edit the document in an app like MS Word, and then save it again as a pdf.
Also Read Everything You Need to Know About the Apple Watch

1. Head to PDFonline and click on Upload a File to Convert. Select your file and upload it - this can take some time for large files.
2. When uploading is complete, the website will show you the document, along with aDownload button at the top. Click this button and select Download Word file. This will save the document as an rtf file, which can be opened by most text editors including Microsoft Word. Open it and make the changes you wanted to. In case you see a yellow band with the words "Protected View", then you will need to click on Enable Editingfirst.
3. When you are done editing, you can save the document as a pdf file. In Microsoft Word, click File > Save as and select PDF as the file type from the "Save as type" drop down menu under the filename. LibreOffice has a Export as PDF option in the Filemenu.
This method works best when the data on the pdf file is in a format that suits the format you choose to convert it to. For example, you are bound to face formatting issues if you try to convert a heavy pdf file with several images to Word format.
While the Web-based method works best, if you want to convert files without an Internet connection, you will have to download the PDF to Word converter software for Windows.
PDF_Online_635.jpg
iPhone and iPad
Unfortunately, there are no good, free pdf editing tools for you. The closest thing to a free pdf editor on iOS is Foxit Mobile. It's free to download and you can try all its tools on a couple of sample pdf files that come with it. The catch is that the app asks you to pay Rs 60 each for Dropbox, SkyDrive or Google Drive support. You can edit as many pdf files in the selected cloud account after that. If you want to create a new pdf from photos and text on your iOS device, you'll have to shell out Rs 60 more as a one-time purchase. Here's how to use Foxit on your iOS device.
1. Open your pdf file and select the pencil tool at the top. Now, all editing tools will appear at the top.
2. Select the tool you need (text, drawing, eraser or comment) and start editing.
3. When you finish editing, hit the back button at the top-left. Then select the export button (a box with an arrow pointing out of it) on the top-right to save or share the edited file.
PDF_Edit_Foxit_635.jpg


Also Read How to Share Location on WhatsApp?

NOTE: Feel Free To Comment....
Unknown  /  at  13:52  /  No comments

pdf_format_wikipedia.jpg

Also Read Apple Unveils 'Apple Pay' Mobile Wallet and Payment System

Ever received a pdf file as an attachment, and wondered how to append your signature without printing it out and scanning the final copy? Or how to fix that one typo before sending it back? Of course you have.
The pdf or Portable Document Format is a popular file format that lets you view documents across platforms without disturbing its formatting. PDF files, which often house comics, novels and various bills, aren't meant to be edited. That's why it is hard to find a one-size-fits-all pdf editing solution for free. But it can be very inconvenient when you need to fill a form or add a line to a document which was sent as a pdf.
While Adobe Acrobat XI (Rs 30,000) and Nitro PDF Editor (Rs 11,000) are good apps, their cost is prohibitive for most people. Luckily, there are free alternatives on most devices now. Read on to find out how to edit pdf files without spending a dime.
On the Web (Works on Android, BlackBerry 10)

If you don't have a Windows or a Mac machine, or if you don't want to install any applications, head to PDF Buddy for basic editing tools. This website also works for editing pdf files on an Android phone, but not on iOS devices. In case you want to try the website first, PDF Buddy lets you use basic features (adding shapes, symbols, text, whiteout and highlight) without creating an account. You will have to create an account if you want to do anything useful like save or download the edited file, add images or signatures to the pdf file. You can edit up to three pdf files a month for free. The website asks you to pay $8 (roughly Rs 500) per month to let you edit an unlimited number of files.
Ease of use is PDF Buddy's strength, but it may not be the best tool for power users. Text editing options are limited to two fonts and you'll have to manually place text so that it aligns with the rest of the line. However, this may not be a limitation for those who just want to fill out forms without printing the document. PDF Buddy also lets you merge, split and share pdf files. Here is how to use it:
1. Drag a pdf file into the browser or click the Choose PDF to Edit button on the website and then select the file you want to edit.
2. Now, PDF Buddy will open the file (might take long for large files). Once it opens, you'll see a set of editing tools on the left side of the file.
3. The editing tools are fairly straightforward, since the name of each tool tells you what it does. You can choose the text tool to edit text and whiteout tool to erase text. Note that only two fonts are supported (Arial and Times). You can also highlight text, add images and signatures, using the corresponding tools.
4. Below the tools mentioned above, PDF Buddy has shapes and symbols, which you can add to your file. You can use symbols such as "thumbs up", "thumbs down" and "arrows" as bullet points or for annotations if needed.
5. Above the pdf file, you'll see arrows pointing to the right and left. Use these to move to the next or previous page.
6. When you finish editing, hit the Save button at the top of the page. This will save a copy of the file on the website. If you want to save it on your computer, click theDownload button that's next to the Save button.
Also Read iPhone 6 and iPhone 6 Plus Available in India October 17; Price Unknown
PDF_Buddy_Edit_635.jpg
For desktops and laptops

For those who use Windows, Mac or Linux, LibreOffice Draw may be the best programme for editing text in pdf files. LibreOffice is a full office suite and you'll have to download the setup file for the whole suite to use Draw. Fortunately, during installation the programme lets you select the software you want to install. This means that you can install Draw without installing all the other apps in the office suite. Like PDF Buddy, Draw is easy to use. Follow these steps and you should be able to edit pdf files easily. Note that these steps are for the Windows version of Draw, but the process is similar for Mac and Linux.
1. LibreOffice Draw can open pdf files without any configuration. All you have to do is press Ctrl+O or click File > Open, and select your pdf file.
2. All the tools are laid out at the bottom and should be familiar to anyone who has used MS Word. Click on the line you need to start editing and get to work.
3. Before you get to editing, note that LibreOffice Draw can make formatting go haywire. We imported a pdf file with bullet points, symbols and underlines. Draw moved all of these and it took us a lot of time to restore these to their original positions.
4. To align various elements, just click and drag to move them.
5. As long as your system has the font used in the pdf file, text editing is fairly easy. All you need to do is select the text you want to edit and start typing. Each line of text, bullet point, underline, etc. appear as an object in Draw.
6. When you finish editing, select the Export as PDF option in the File menu.
LibreOffice_Draw_635.jpg
Using a word processing app
Another way to edit pdf files is to convert them to a more edit-friendly file format. Websites such as PDFtoword or PDFonline. PDFtoword also lets you convert pdf files to Excel and Powerpoint formats. This lets you edit the document in an app like MS Word, and then save it again as a pdf.
Also Read Everything You Need to Know About the Apple Watch

1. Head to PDFonline and click on Upload a File to Convert. Select your file and upload it - this can take some time for large files.
2. When uploading is complete, the website will show you the document, along with aDownload button at the top. Click this button and select Download Word file. This will save the document as an rtf file, which can be opened by most text editors including Microsoft Word. Open it and make the changes you wanted to. In case you see a yellow band with the words "Protected View", then you will need to click on Enable Editingfirst.
3. When you are done editing, you can save the document as a pdf file. In Microsoft Word, click File > Save as and select PDF as the file type from the "Save as type" drop down menu under the filename. LibreOffice has a Export as PDF option in the Filemenu.
This method works best when the data on the pdf file is in a format that suits the format you choose to convert it to. For example, you are bound to face formatting issues if you try to convert a heavy pdf file with several images to Word format.
While the Web-based method works best, if you want to convert files without an Internet connection, you will have to download the PDF to Word converter software for Windows.
PDF_Online_635.jpg
iPhone and iPad
Unfortunately, there are no good, free pdf editing tools for you. The closest thing to a free pdf editor on iOS is Foxit Mobile. It's free to download and you can try all its tools on a couple of sample pdf files that come with it. The catch is that the app asks you to pay Rs 60 each for Dropbox, SkyDrive or Google Drive support. You can edit as many pdf files in the selected cloud account after that. If you want to create a new pdf from photos and text on your iOS device, you'll have to shell out Rs 60 more as a one-time purchase. Here's how to use Foxit on your iOS device.
1. Open your pdf file and select the pencil tool at the top. Now, all editing tools will appear at the top.
2. Select the tool you need (text, drawing, eraser or comment) and start editing.
3. When you finish editing, hit the back button at the top-left. Then select the export button (a box with an arrow pointing out of it) on the top-right to save or share the edited file.
PDF_Edit_Foxit_635.jpg


Also Read How to Share Location on WhatsApp?

NOTE: Feel Free To Comment....

Thursday, 7 August 2014

Indian Telcos Want to Suppress WhatsApp Even if Consumers Suffer

whatsapp_access_denied.jpg

Also Read WeChat Offers Users Free Recharge up to Rs. 60 for Sharing Stickers

The Telecom Regulatory Authority of India (Trai) apparently wants to try wringing money out of messaging apps such as WhatsApp, Viber, Skype and WeChat on behalf of itself and mobile service providers who feel that they have the right to be compensated for revenues lost when people use such apps instead of making phone calls and sending SMS messages.
This is the same sort of logic that leads certain countries and municipalities to impose taxes on home solar panels because local coal-fired power plants are losing business.
One issue here is that service providers are banding together to try to extract more money than they already get because they sense an easy target. Another is that they're trying to use a neutral government agency to "regulate" their own competition. More importantly, the ideal of network neutrality is now under threat, because certain services might be burdened with some sort of tax or fee just for the privilege of being able to conduct business as usual.
Trai's plans are similar to recent moves by Internet service providers in the USA to lobby for the ability to set up Internet "fast lanes" and charge those companies able (if not willing) to pay more for priority (read: non-degraded) consumer experiences. Web startups and smaller companies would have a tough time surviving if they had to pay ISPs in order for consumers to be able to use them - regardless of the fact that ISPs are already being paid fees by users who should be able to use their bandwidth quotas in any way they like.
There's no question that handing service providers the ability to throttle certain services is bad for everyone involved - Internet users, entrepreneurs, and the tech economy as a whole. We need to be even more concerned that these service providers are trying to put themselves in a position of power over their competitors. Yes, long-distance telephony revenue has fallen thanks to VoIP, and people send fewer SMS messages because free Web messengers are available. So what? Business landscapes change all the time.
Everyone needs to adapt, not cling to the past. Cellular operators are not expected to compensate landline phone companies for the reduced usage of public pay-phones. Besides, the operators don't provide 2G/ 3G connectivity for free; there are monthly charges as well as data usage charges, and they aren't particularly fast, reliable or cheap.
Internet service providers and mobile operators create and maintain the pipes through which data flows, and they are paid not only by subscribers but also by content delivery networks which are widely used throughout the industry. The kind of data flowing through these pipes, its origins, destinations and relative proportions, are of no concern to them. They cannot be allowed to pick and choose who or what should get privileged carriage based on their own competitive interests.
Messenger apps have not replaced SMS entirely. People chat more via WhatsApp than they ever would have over SMS alone. There is no question of creating a "level playing field", as the mobile operators seem to be couching their argument. In fact by creating privileged levels of access to data transmission services they are actively creating a non-level field and stifling new innovations and developments that are of benefit to billions of people around the world.
If this proposal fails, there will be more complaints about messaging apps in order to demand "regulations" (and inevitably, scare tactics such as invoking the bogeys of terrorism, piracy, national security threats, pornography and who-knows-what-else will be used). It's now up to the Trai to ensure that ordinary users are not harmed and that the Indian tech business environment is not compromised by misguided policies.


SOURCE: http://gadgets.ndtv.com/

Also Read Micromax Replaces Samsung as Largest Mobile Phone Vendor in India: Report

NOTE: Feel Free To Comment....
Unknown  /  at  18:51  /  No comments

whatsapp_access_denied.jpg

Also Read WeChat Offers Users Free Recharge up to Rs. 60 for Sharing Stickers

The Telecom Regulatory Authority of India (Trai) apparently wants to try wringing money out of messaging apps such as WhatsApp, Viber, Skype and WeChat on behalf of itself and mobile service providers who feel that they have the right to be compensated for revenues lost when people use such apps instead of making phone calls and sending SMS messages.
This is the same sort of logic that leads certain countries and municipalities to impose taxes on home solar panels because local coal-fired power plants are losing business.
One issue here is that service providers are banding together to try to extract more money than they already get because they sense an easy target. Another is that they're trying to use a neutral government agency to "regulate" their own competition. More importantly, the ideal of network neutrality is now under threat, because certain services might be burdened with some sort of tax or fee just for the privilege of being able to conduct business as usual.
Trai's plans are similar to recent moves by Internet service providers in the USA to lobby for the ability to set up Internet "fast lanes" and charge those companies able (if not willing) to pay more for priority (read: non-degraded) consumer experiences. Web startups and smaller companies would have a tough time surviving if they had to pay ISPs in order for consumers to be able to use them - regardless of the fact that ISPs are already being paid fees by users who should be able to use their bandwidth quotas in any way they like.
There's no question that handing service providers the ability to throttle certain services is bad for everyone involved - Internet users, entrepreneurs, and the tech economy as a whole. We need to be even more concerned that these service providers are trying to put themselves in a position of power over their competitors. Yes, long-distance telephony revenue has fallen thanks to VoIP, and people send fewer SMS messages because free Web messengers are available. So what? Business landscapes change all the time.
Everyone needs to adapt, not cling to the past. Cellular operators are not expected to compensate landline phone companies for the reduced usage of public pay-phones. Besides, the operators don't provide 2G/ 3G connectivity for free; there are monthly charges as well as data usage charges, and they aren't particularly fast, reliable or cheap.
Internet service providers and mobile operators create and maintain the pipes through which data flows, and they are paid not only by subscribers but also by content delivery networks which are widely used throughout the industry. The kind of data flowing through these pipes, its origins, destinations and relative proportions, are of no concern to them. They cannot be allowed to pick and choose who or what should get privileged carriage based on their own competitive interests.
Messenger apps have not replaced SMS entirely. People chat more via WhatsApp than they ever would have over SMS alone. There is no question of creating a "level playing field", as the mobile operators seem to be couching their argument. In fact by creating privileged levels of access to data transmission services they are actively creating a non-level field and stifling new innovations and developments that are of benefit to billions of people around the world.
If this proposal fails, there will be more complaints about messaging apps in order to demand "regulations" (and inevitably, scare tactics such as invoking the bogeys of terrorism, piracy, national security threats, pornography and who-knows-what-else will be used). It's now up to the Trai to ensure that ordinary users are not harmed and that the Indian tech business environment is not compromised by misguided policies.


SOURCE: http://gadgets.ndtv.com/

Also Read Micromax Replaces Samsung as Largest Mobile Phone Vendor in India: Report

NOTE: Feel Free To Comment....

Thursday, 31 July 2014

GestureWorks Gameplay App Turns Your Android Device Into A Gamepad

Ideum launches version 2 of its GestureWorks Gameplay virtual controller app. With Android support you will be able to use your Android smartphone or tablet to play PC games, rather than a gamepad or keyboard.

Also Read Samsung Galaxy Star 2 Plus with Android 4.4 KitKat Launched at Rs. 7,335

The great thing is you will still be able to customize the controls for various titles, so you can optimize your gaming experience for all your favorite games. The updated app also supports more graphics standards, meaning that more games are compatible with the software.
gestureworks gameplay
The full version of the Gameplay app has quite a hefty price of $14.99 but when you consider what you get, it’s actually not that bad. Any friends who want to join you for a multiplayer session won’t need to bring any dedicated hardware because up to four Android devices can be connected at any one time.
You can download GestureWorks Gameplay now from Steam.


Also Read Alleged 'Near-Final' Moto X+1 Prototype Spotted With 5.1-Inch Display

NOTE: Feel Free To Comment....
Unknown  /  at  13:15  /  No comments

Ideum launches version 2 of its GestureWorks Gameplay virtual controller app. With Android support you will be able to use your Android smartphone or tablet to play PC games, rather than a gamepad or keyboard.

Also Read Samsung Galaxy Star 2 Plus with Android 4.4 KitKat Launched at Rs. 7,335

The great thing is you will still be able to customize the controls for various titles, so you can optimize your gaming experience for all your favorite games. The updated app also supports more graphics standards, meaning that more games are compatible with the software.
gestureworks gameplay
The full version of the Gameplay app has quite a hefty price of $14.99 but when you consider what you get, it’s actually not that bad. Any friends who want to join you for a multiplayer session won’t need to bring any dedicated hardware because up to four Android devices can be connected at any one time.
You can download GestureWorks Gameplay now from Steam.


Also Read Alleged 'Near-Final' Moto X+1 Prototype Spotted With 5.1-Inch Display

NOTE: Feel Free To Comment....

Posted in: , Read Complete Article»

Monday, 16 June 2014

How to Install Android 4.4 KitKat on Windows PC


Also Read How to Watch Fifa World Cup 2014 Live on Your PC, Smartphone or Tablet

This article will guide you on How to Install Android 4.4 KitKat on Windows PC. Be sure check all the prerequisites before you proceed with the steps.
Android 4.4 KitKat is the latest version of Android OS released by Google. Until now, only 8-9% smartphones have been upgraded to Android 4.4 KitKat including new device, which had Android 4.4 KitKat running out of the box. It is a fact that not every android running Smartphone will get Android 4.4 KitKat update except few flagship and high-end devices from major OEMs. Now if you are stuck with a low-end or mid-range device, which have not received Android 4.4 KitKat update yet, then the only thing you can do is wait for the official release from your manufacturer.
However, for a change you can experience the same by installing Android 4.4 KitKat on your Windows PC. To install Android 4.4 KitKat on PC we will be using Oracle Virtualbox. Follow these steps for the same.
Prerequisites
Once you download oracle VirtualBox, install it. Keep Android 4.4 KitKat Image files as it is and proceed with these steps.

Also Read How To Remove Vocals From Music Tracks Using Audacity

How to Install Android 4.4 KitKat on PC

1. Run VirtualBox
2. Now click on New button (top right corner)
3. In the next window type name as Android 4.4 KitKat, Type as Linux and Version as Other Linux (332 bit). Click on Next
4. Now you have to select memory size (RAM) recommended is 256MB, but keep it as 800MB ( more or less depending upon the memory size. Click on Next
5. Select Create a virtual hard drive now and click on Create
6. Select VDI (VirtualBox Disk Image) and click on Next
7. Select Fixed size and click Next
8. In the next window, you have set storage space for Virtual Disk Image on your hard drive. Once selected, click Create
9. Now, you will see an Android 4.4 KitKat file in Oracle VirtualBOx
10. Right click on it and select Start
11. Here, you will be prompted to select downloaded Android 4.4 ISO image. So click on small box/file icon and navigate to the folder where you have stored Android 4.4 ISO image. Select it and click on Open
12. Click on Start button
13. Select Install Android-86 to Harddisk
14. Select Create/Modify Partitions and click OK
15. Select New
16. Select Primary
17. Press Enter to proceed
18. Select Write
19. Now, type YES and press enter

Also Read How to disable or delay the lock(Login) screen in Windows 8

20. Select Quit and press enter
21. Next, select Sda1 linux VBOX HARDDISK, select OK and press enter
22. Select ext3 filesystem and select OK
23. Select Yes and press enter
24. You will be prompted to install boot loader GRUB. Select Yes and press and enter
25. Again select  Yes and press enter
26. Select Reboot, select OK and press enter
27. Now select Device > CD/DVD Devices > Android-x86-4.4-RC1.iso (ISO image)
28. Next, select Machine > Close > Power off the machine and OK
29. Now again right click on Android 4.4 KitKat file in VirtualBox and select Start
30. Select Android-x86 4.4-RC1 and hit enter
That’s all! You have successfully installed Android 4.4 KitKat on Windows PC. Now you should see a booting screen. It will ask you enter few details, after entering them you can use Android 4.4 KitKat on your PC.
Fore more detailed tutorial watch this video.


NOTE: Feel Free To Comment....
Unknown  /  at  16:30  /  No comments


Also Read How to Watch Fifa World Cup 2014 Live on Your PC, Smartphone or Tablet

This article will guide you on How to Install Android 4.4 KitKat on Windows PC. Be sure check all the prerequisites before you proceed with the steps.
Android 4.4 KitKat is the latest version of Android OS released by Google. Until now, only 8-9% smartphones have been upgraded to Android 4.4 KitKat including new device, which had Android 4.4 KitKat running out of the box. It is a fact that not every android running Smartphone will get Android 4.4 KitKat update except few flagship and high-end devices from major OEMs. Now if you are stuck with a low-end or mid-range device, which have not received Android 4.4 KitKat update yet, then the only thing you can do is wait for the official release from your manufacturer.
However, for a change you can experience the same by installing Android 4.4 KitKat on your Windows PC. To install Android 4.4 KitKat on PC we will be using Oracle Virtualbox. Follow these steps for the same.
Prerequisites
Once you download oracle VirtualBox, install it. Keep Android 4.4 KitKat Image files as it is and proceed with these steps.

Also Read How To Remove Vocals From Music Tracks Using Audacity

How to Install Android 4.4 KitKat on PC

1. Run VirtualBox
2. Now click on New button (top right corner)
3. In the next window type name as Android 4.4 KitKat, Type as Linux and Version as Other Linux (332 bit). Click on Next
4. Now you have to select memory size (RAM) recommended is 256MB, but keep it as 800MB ( more or less depending upon the memory size. Click on Next
5. Select Create a virtual hard drive now and click on Create
6. Select VDI (VirtualBox Disk Image) and click on Next
7. Select Fixed size and click Next
8. In the next window, you have set storage space for Virtual Disk Image on your hard drive. Once selected, click Create
9. Now, you will see an Android 4.4 KitKat file in Oracle VirtualBOx
10. Right click on it and select Start
11. Here, you will be prompted to select downloaded Android 4.4 ISO image. So click on small box/file icon and navigate to the folder where you have stored Android 4.4 ISO image. Select it and click on Open
12. Click on Start button
13. Select Install Android-86 to Harddisk
14. Select Create/Modify Partitions and click OK
15. Select New
16. Select Primary
17. Press Enter to proceed
18. Select Write
19. Now, type YES and press enter

Also Read How to disable or delay the lock(Login) screen in Windows 8

20. Select Quit and press enter
21. Next, select Sda1 linux VBOX HARDDISK, select OK and press enter
22. Select ext3 filesystem and select OK
23. Select Yes and press enter
24. You will be prompted to install boot loader GRUB. Select Yes and press and enter
25. Again select  Yes and press enter
26. Select Reboot, select OK and press enter
27. Now select Device > CD/DVD Devices > Android-x86-4.4-RC1.iso (ISO image)
28. Next, select Machine > Close > Power off the machine and OK
29. Now again right click on Android 4.4 KitKat file in VirtualBox and select Start
30. Select Android-x86 4.4-RC1 and hit enter
That’s all! You have successfully installed Android 4.4 KitKat on Windows PC. Now you should see a booting screen. It will ask you enter few details, after entering them you can use Android 4.4 KitKat on your PC.
Fore more detailed tutorial watch this video.


NOTE: Feel Free To Comment....

Posted in: , , Read Complete Article»

Thursday, 12 June 2014

How to Watch Fifa World Cup 2014 Live on Your PC, Smartphone or Tablet

liv_sports_app.jpg

Also Read Be The First To Read All About The Release Of Firefox 30


Whether you don't have a TV at home, or you need to be out during the matches of the Fifa World Cup that starts from Thursday, you needn't give up hope, because there are plenty of ways in which you can keep up with the action as long as you are online.
Most of the well-known international apps and sites like the BBC iPlayer, don't have the rights to air the matches in India, but there are plenty of local alternatives.
Since there is no single global solution, this guide is only useful to people in India; different broadcasters hold the rights to stream the matches around the world, so it wouldn't be possible to list solutions for every country. However, if you can do without video, you can follow the action on radio thanks to TuneIn Radio - it is free and works on iPhones and iPads and Android devices. You can also visit the website directly, and go to their World Cup Page. Otherwise, here is a list of broadcasters for the Fifa World Cup globally - check your local broadcasters page and you might find a way to follow online.

Also Read How to Clean Facebook, Twitter, and Other Social Websites

Here's what you'll need in India, to watch the Fifa World Cup on your PC, phone or tablet.
Liv Sports website
livsports_screenshot.jpg
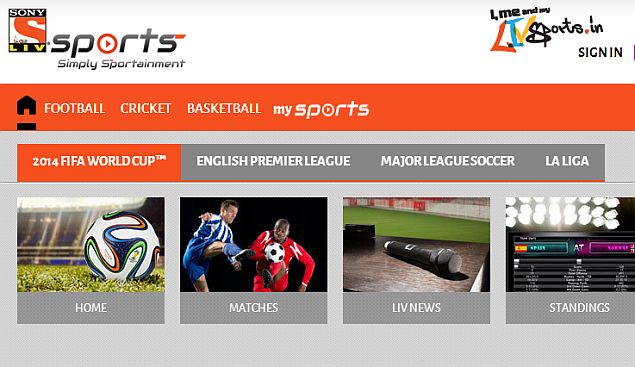
Sony Liv has the digital rights for the Fifa World cup in India, and you can watch along on their webpage. To watch the matches, just visit the website from your computer and register online for free. Aside from watching the streams, you can also get information about the games, match stats, highlights and exclusive interviews. The website is offering the Fifa World Cup pack for 120 rupees for the entire tournament, which seems like quite a bargain.
YouTube
youtube_fifa_screenshot.jpg
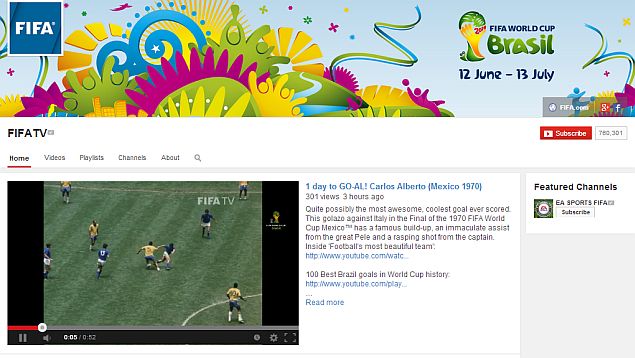
In case the Liv Sports website isn't working properly for some reason, you can double check with the official Sony Six Channel on YouTube. The channel will carry a delayed broadcast of the matches, which might also be handy if you've missed something exiting and want to "rewind" a little. Also, on the official Fifa channel on Youtube you can watch highlights from the matches, and also classic matches and other videos.

Also Read 5000ppi Hologram Projection Phones To Arrive Next Year

Liv Sports app
This is the official app for Sony Liv, and the easiest way to watch the matches on your phone or tablet. However, it also requires an up-front payment to watch the action, just like the website.
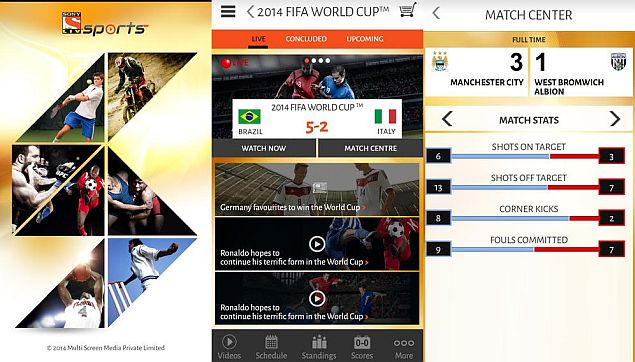
On your phone, you need to download the Liv Sports app (pictured above), which is available for both iOS and Android devices. The app is free to download, but you need to pay to watch the streams. A Rs. 120 in-app purchase will give you access to everything, but if you just want to follow your favourite team, you could unlock all the matches of a single team for Rs. 60.
Aside from the HD streams, the app also includes real time stats and commentary of the matches, which are available to everyone.
Tata Sky Everywhere TV app
everywhere_tv_1.jpg
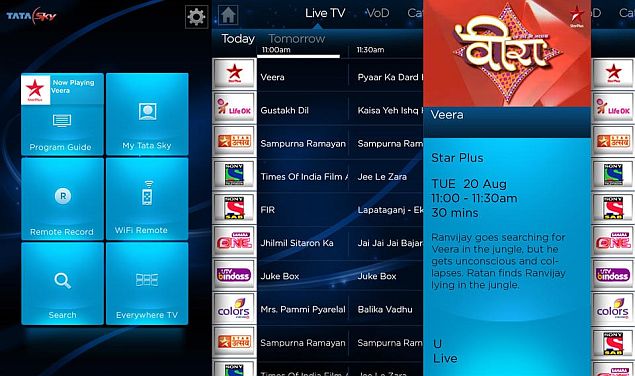
If you are a Tata Sky subscriber then you can download the mobile application for iPhone, iPad or Android devices and watch the World Cup live. After that, you will need to activate Everywhere TV from Tata Sky, which is free for one month. After that, Tata Sky charges Rs. 60 for the service.
This is not a bad deal for a Tata Sky user, since it gives you access not just to the matches, but all your TV channels, on the go. And since the first month is free, you could use this to watch the matches without paying anything.


Also Read How to Get – Use Cortana on Windows Phone 8.1 Outside US?

NOTE: Feel Free To Comment....
Unknown  /  at  20:24  /  2 comments

liv_sports_app.jpg

Also Read Be The First To Read All About The Release Of Firefox 30


Whether you don't have a TV at home, or you need to be out during the matches of the Fifa World Cup that starts from Thursday, you needn't give up hope, because there are plenty of ways in which you can keep up with the action as long as you are online.
Most of the well-known international apps and sites like the BBC iPlayer, don't have the rights to air the matches in India, but there are plenty of local alternatives.
Since there is no single global solution, this guide is only useful to people in India; different broadcasters hold the rights to stream the matches around the world, so it wouldn't be possible to list solutions for every country. However, if you can do without video, you can follow the action on radio thanks to TuneIn Radio - it is free and works on iPhones and iPads and Android devices. You can also visit the website directly, and go to their World Cup Page. Otherwise, here is a list of broadcasters for the Fifa World Cup globally - check your local broadcasters page and you might find a way to follow online.

Also Read How to Clean Facebook, Twitter, and Other Social Websites

Here's what you'll need in India, to watch the Fifa World Cup on your PC, phone or tablet.
Liv Sports website
livsports_screenshot.jpg
Sony Liv has the digital rights for the Fifa World cup in India, and you can watch along on their webpage. To watch the matches, just visit the website from your computer and register online for free. Aside from watching the streams, you can also get information about the games, match stats, highlights and exclusive interviews. The website is offering the Fifa World Cup pack for 120 rupees for the entire tournament, which seems like quite a bargain.
YouTube
youtube_fifa_screenshot.jpg
In case the Liv Sports website isn't working properly for some reason, you can double check with the official Sony Six Channel on YouTube. The channel will carry a delayed broadcast of the matches, which might also be handy if you've missed something exiting and want to "rewind" a little. Also, on the official Fifa channel on Youtube you can watch highlights from the matches, and also classic matches and other videos.

Also Read 5000ppi Hologram Projection Phones To Arrive Next Year

Liv Sports app
This is the official app for Sony Liv, and the easiest way to watch the matches on your phone or tablet. However, it also requires an up-front payment to watch the action, just like the website.
On your phone, you need to download the Liv Sports app (pictured above), which is available for both iOS and Android devices. The app is free to download, but you need to pay to watch the streams. A Rs. 120 in-app purchase will give you access to everything, but if you just want to follow your favourite team, you could unlock all the matches of a single team for Rs. 60.
Aside from the HD streams, the app also includes real time stats and commentary of the matches, which are available to everyone.
Tata Sky Everywhere TV app
everywhere_tv_1.jpg
If you are a Tata Sky subscriber then you can download the mobile application for iPhone, iPad or Android devices and watch the World Cup live. After that, you will need to activate Everywhere TV from Tata Sky, which is free for one month. After that, Tata Sky charges Rs. 60 for the service.
This is not a bad deal for a Tata Sky user, since it gives you access not just to the matches, but all your TV channels, on the go. And since the first month is free, you could use this to watch the matches without paying anything.


Also Read How to Get – Use Cortana on Windows Phone 8.1 Outside US?

NOTE: Feel Free To Comment....

Posted in: , Read Complete Article»

About

This blog belong to all our youngster friendz, who believe in sharing their knowledge with others and want to try to hackin', crackin' , full version applications at free of cost.
you will found here valuable stuffs.

Labels

adf.ly blocked (1) android (109) Android and PC (19) android games (11) android news (3) android tricks (43) Antivirus (11) Anvsoft (1) apple (40) asha phones (1) avast (1) avast pro antivirus 8 2013 (1) avg (1) AVG pc tuneup 2013 full version (1) avira (1) blackberry (1) blogspot (2) body_language (1) bootable usb (1) Browsers (16) c cleaner pro + business (1) Cheatbook 2013 (1) Chetan Bhagat (1) compressor (1) crac (1) Crack (1) crack + keygen (2) cyberlink power2go full version (1) daemon tools 5.2 full version (1) daemon tools patch (1) defender (2) dictionary (1) direct link (1) DivX Pro 7 (1) Ebook (2) eset (1) etc (1) facebook (16) Firewall (2) free recharge tricks (1) free sms (1) FRUIT NINJA for windows full version (1) full version (8) Full Version MS Office 13 (1) GTA Sandreas (1) hack (4) hack pc (3) hacking using keylogger (1) hardware (1) hiDownload platinum 8 (1) how to (6) how to install .net (1) HTML (1) idm (1) idm crack (1) IDM full version (1) image editor (2) install .net in windows 8 (1) internet tricks (37) iPhone 5c (2) job (1) k j activator (1) kaspersky (2) keygen (2) leaked images (1) license key (1) manual updates (1) mediafire (1) MEDIAFIRE DOWNLOAD (2) mediafire link (2) mobiles (42) music player (1) nfs most wanted (1) Office 13 Activator (1) official site update (1) offline updates (1) patch (4) PC (3) pc customize (1) PC Drivers (2) pc games (15) pc games cheats (11) PC Software (152) PC tricks (146) PdaNET 3.50 (1) PDF (3) phone specifications (43) pic viewer (3) power iso 5.6 (1) premium zbigz account (1) problem with .net in windows 8 (1) review (11) reviews (2) Revolution 2020 PDF (1) science (2) sharebeast download (6) sharebeast link (2) symbian mobiles (2) tech knowledge (33) Tech News (343) tech reviews (146) Torrent To IDM (1) Tune-Up 2014 Full Version (1) Ubuntu Mobiles (1) video player (13) video tutorial (1) Web design (1) window 8.1 tricks (12) windows 8 activator (1) Windows 8 USB Installer Maker (1) windows phones (16) winrar 5 full version (1)
Copyright © 2014 SimplyGet. WP Theme-junkie converted by Bloggertheme9
Blogger templates. Proudly Powered by Blogger.