Showing posts with label internet tricks. Show all posts

Sunday, 28 September 2014

12 Things DuckDuckGo Can Do That Google Can't

DuckDuckGo_Logo.jpg
Search engines have evolved to make it easier to find the information you need without having to go through different websites. Google has the Knowledge Graph feature that shows a neat box with useful information above (or beside) search results. It can do cool things such as calculations, show flight information and even currency conversion.
Although these features are incredibly useful, Google Knowledge Graph has its shortcomings. The biggest problem is that results are not uniform. When we were digging through Knowledge Graph features to find cool things you didn't know you could do with Google, we noticed that the results were not always the same. When one person searched for Apple stocks, Google showed him regular search results, but when a colleague searched for the same term, he was shown current stock information along with a nice price versus time graph.
These limitations made us look for alternatives and we found one that impressed us with its utility - DuckDuckGo. DuckDuckGo is a privacy-focussed search engine. DuckDuckGo is a search engine that shows the same results for a search term to all its users. This is unlike Google, which filters search results based on the sites you have been visiting. It is also now possible to set DuckDuckGo as a default search engine in iOS 8 as well as OS X so you can get the instant search results just by typing your query into the Safari browser. Of course you can also use DuckDuckGo in Chrome or Firefox by visiting DuckDuckGo.com and clicking the Use in Chrome or Use in Firefox button.
Because it doesn't try to personalise results, DuckDuckGo's instant answers work for everyone and it has a great community of developers and users that are constantly adding new sources for answers. After using DuckDuckGo as our primary search engine for quite some time, we found that its instant answers are often as good as or better than Google's Knowledge Graph. Here are 12 amazing things DuckDuckGo can do that Google can't.
1. Social media bio
DuckDuckGo lets you see the social media profiles of people without leaving the search engine. The same thing works for Google+ and Gravatar as well. To look up a Twitter bio, you need to search for the handle. For Google+, type G+ and then the name of the user. For Gravatar, just type Gravatar, and then the username you want to look up.
Another cool feature that is related is letting you search inside other sites. With Google, you can use the site: modifier to search for results within a particular site, but then you still have to open the link to see the results. With DuckDuckGo, you can use the site's own search functions.
For example, if you want to search for someone's details on LinkedIn, you don't need to open the site. Just type "!linkedin" followed by the person's name, and you will see the LinkedIn search results page. You can do this with a large number of websites; !g lets you search with Google, !a is Amazon, !r is Reddit, just to name a few. You can see the full list by just typing ! in the DuckDuckGo search bar.
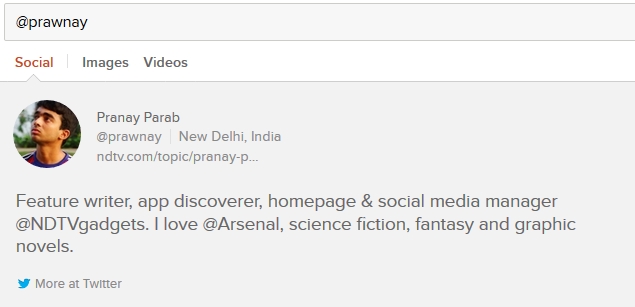
duckduckgo_twitter_bio.jpg
2. App store search, alternatives to apps

Also Read Full Specs Of Micromax Canvas Nitro

Search for any popular app on DuckDuckGo and you will find that it shows a carousel full of apps with similar names. Clicking on any one of the cards on the carousel will show you the price of the app, a description and links to the store. We found that this feature doesn't work with very obscure apps, but it can find most of the well-known ones.
Another useful feature shows alternatives to apps in a neat carousel. Tired of MS Office? Just search for "Alternative to Word" and see the results for yourself. It also works for Web services, so you can even search for "Alternative to DuckDuckGo", if you like.
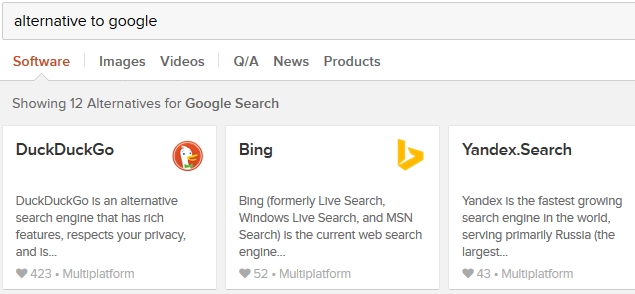
duckduckgo_alternativeto_1.jpg
3. Shorten and expand links
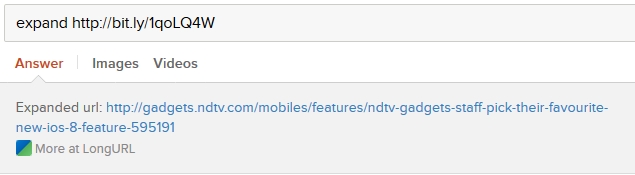
Want to find out which websites are at the end of shortened links such as http://bit.ly/1tYrmaB ? Open DuckDuckGo and search "expand http://bit.ly/1tYrmaB".
duckduckgo_expand.jpg
4. Generate passwords
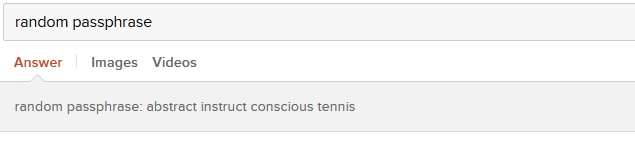
Can't think of a strong password? Just head to DuckDuckGo and search for "Password 20". You'll see a strong 20-character password. You can replace the number to change the number of characters in the password. If you find those random passwords hard to remember, you can make DuckDuckGo generate XKCD-style passwords. These passwords comprise four common words put together, which are easy to remember and hard to crack, and were first suggested in the popular Web comic XKCD. For these passwords, search "Random passphrase".
duckduckgo_passphrase.jpg
5. Quick stopwatch
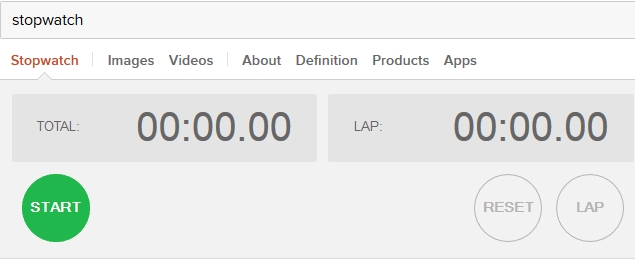
Both Google and DuckDuckGo let you create a quick timer (search for "timer") but DuckDuckGo also has a stopwatch. Simply search for "stopwatch" to use it.
duckduckgo_stopwatch.jpg
6. Change case and check number of characters
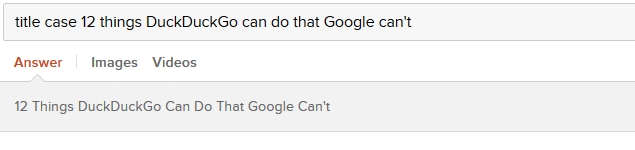
Want to change a sentence to Title Case, lowercase or UPPERCASE? Just add one of those three terms before your sentence and key it in on DuckDuckGo.
Another interesting feature is the number of characters. You can quickly check how many characters are in your search query by adding "chars" before or after the query. Try searching for "chars I really like this article" without the quotes and see the results.
duckduckgo_titlecase_1.jpg
7. Checks whether websites are down
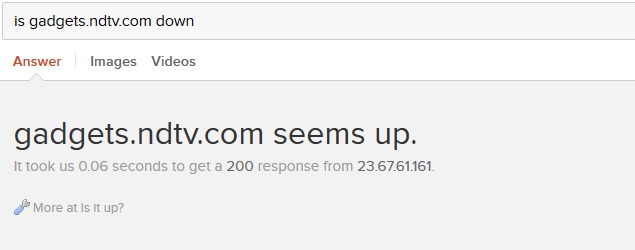
If you can't open a website, you might want to check if it is not opening anywhere or just on your computer. You can use websites such as isup.me to check this or you can simply search DuckDuckGo with the keywords.

Also Read Datawind to Launch Rs. 2,000 Android Phone With Free Lifetime Internet
duckduckgo_isitdown.jpg
8. Does mime rhyme with time
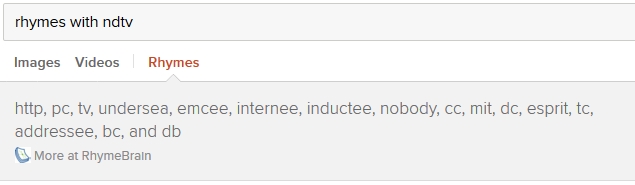
You read that right. DuckDuckGo also has an instant answer that finds rhyming words. Search any word you can think of. You'll see an instant answer with rhyming words, from RhymeBrain.
duckduckgo_rhyme.jpg
9. Calendar
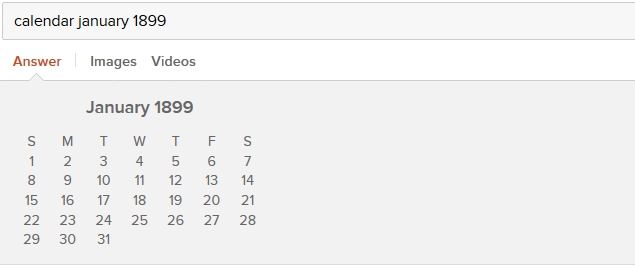
Google and DuckDuckGo can show you the current date and time. But DuckDuckGo goes one step further by supporting calendar as an instant answer. Search "calendar" to see one, with the current date highlighted. It can also show you the calendar for any month and year. Try searching for "calendar january 1899".
duckduckgo_calendar.jpg
10. Loan calculator
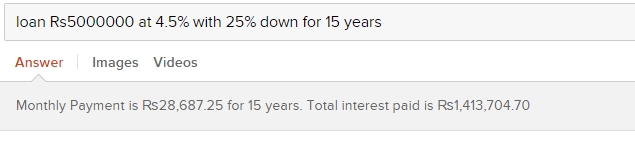
Another useful DuckDuckGo instant answer is a loan calculator. It's useful if you want to see how much your monthly installments will be and how much interest you'll be paying in total. The search query for this is a little hard to remember, like the terms and conditions for most loan agreements. It is "loan AMOUNT at INTEREST with PERCENT down for DURATION". All the uppercase words are what you need to key in - total amount, interest rate, down payment percentage and the duration of the loan. We tried "loan Rs 50,00,000 at 4.5% with 25% down for 15 years" to get the answer in the picture below.
duckduckgo_loan.jpg
11. Cool features for developers
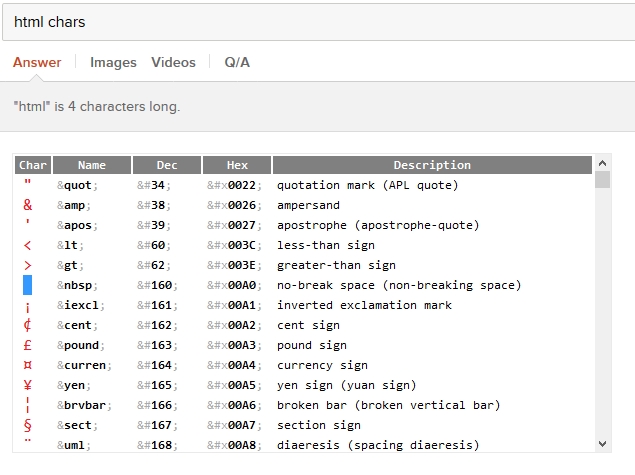
There are several instant answers that will be useful to software developers, but might be less important for the general public. Here's a quick list of what DuckDuckGo can do:
duckduckgo_html.jpg
12. Add instant answers to other search engines
If you like all these instant answers but don't want to leave your favourite search engine, just download the DuckDuckGo extension on Chrome, Safari or Firefox. Now whenever you search, you'll see DuckDuckGo's instant answers above search results in any search engine.
Bonus
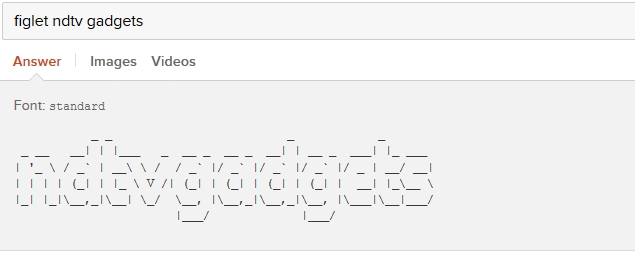
There are several other instant answers on DuckDuckGo that are quite cool, but not very useful. That's why these are included as a bonus in this article. Here's a quick list of some of the best we could find.
duckduckgo_ascii.jpg
These were the best instant answers we could find on DuckDuckGo and none of those are available on Google.


Source: http://gadgets.ndtv.com/

Also Read How to Download and Install iOS 8 on Your iPhone, iPad, or iPod Touch

NOTE: Feel Free To Comment....
Unknown  /  at  13:07  /  No comments

DuckDuckGo_Logo.jpg
Search engines have evolved to make it easier to find the information you need without having to go through different websites. Google has the Knowledge Graph feature that shows a neat box with useful information above (or beside) search results. It can do cool things such as calculations, show flight information and even currency conversion.
Although these features are incredibly useful, Google Knowledge Graph has its shortcomings. The biggest problem is that results are not uniform. When we were digging through Knowledge Graph features to find cool things you didn't know you could do with Google, we noticed that the results were not always the same. When one person searched for Apple stocks, Google showed him regular search results, but when a colleague searched for the same term, he was shown current stock information along with a nice price versus time graph.
These limitations made us look for alternatives and we found one that impressed us with its utility - DuckDuckGo. DuckDuckGo is a privacy-focussed search engine. DuckDuckGo is a search engine that shows the same results for a search term to all its users. This is unlike Google, which filters search results based on the sites you have been visiting. It is also now possible to set DuckDuckGo as a default search engine in iOS 8 as well as OS X so you can get the instant search results just by typing your query into the Safari browser. Of course you can also use DuckDuckGo in Chrome or Firefox by visiting DuckDuckGo.com and clicking the Use in Chrome or Use in Firefox button.
Because it doesn't try to personalise results, DuckDuckGo's instant answers work for everyone and it has a great community of developers and users that are constantly adding new sources for answers. After using DuckDuckGo as our primary search engine for quite some time, we found that its instant answers are often as good as or better than Google's Knowledge Graph. Here are 12 amazing things DuckDuckGo can do that Google can't.
1. Social media bio
DuckDuckGo lets you see the social media profiles of people without leaving the search engine. The same thing works for Google+ and Gravatar as well. To look up a Twitter bio, you need to search for the handle. For Google+, type G+ and then the name of the user. For Gravatar, just type Gravatar, and then the username you want to look up.
Another cool feature that is related is letting you search inside other sites. With Google, you can use the site: modifier to search for results within a particular site, but then you still have to open the link to see the results. With DuckDuckGo, you can use the site's own search functions.
For example, if you want to search for someone's details on LinkedIn, you don't need to open the site. Just type "!linkedin" followed by the person's name, and you will see the LinkedIn search results page. You can do this with a large number of websites; !g lets you search with Google, !a is Amazon, !r is Reddit, just to name a few. You can see the full list by just typing ! in the DuckDuckGo search bar.
duckduckgo_twitter_bio.jpg
2. App store search, alternatives to apps

Also Read Full Specs Of Micromax Canvas Nitro

Search for any popular app on DuckDuckGo and you will find that it shows a carousel full of apps with similar names. Clicking on any one of the cards on the carousel will show you the price of the app, a description and links to the store. We found that this feature doesn't work with very obscure apps, but it can find most of the well-known ones.
Another useful feature shows alternatives to apps in a neat carousel. Tired of MS Office? Just search for "Alternative to Word" and see the results for yourself. It also works for Web services, so you can even search for "Alternative to DuckDuckGo", if you like.
duckduckgo_alternativeto_1.jpg
3. Shorten and expand links
Want to find out which websites are at the end of shortened links such as http://bit.ly/1tYrmaB ? Open DuckDuckGo and search "expand http://bit.ly/1tYrmaB".
duckduckgo_expand.jpg
4. Generate passwords
Can't think of a strong password? Just head to DuckDuckGo and search for "Password 20". You'll see a strong 20-character password. You can replace the number to change the number of characters in the password. If you find those random passwords hard to remember, you can make DuckDuckGo generate XKCD-style passwords. These passwords comprise four common words put together, which are easy to remember and hard to crack, and were first suggested in the popular Web comic XKCD. For these passwords, search "Random passphrase".
duckduckgo_passphrase.jpg
5. Quick stopwatch
Both Google and DuckDuckGo let you create a quick timer (search for "timer") but DuckDuckGo also has a stopwatch. Simply search for "stopwatch" to use it.
duckduckgo_stopwatch.jpg
6. Change case and check number of characters
Want to change a sentence to Title Case, lowercase or UPPERCASE? Just add one of those three terms before your sentence and key it in on DuckDuckGo.
Another interesting feature is the number of characters. You can quickly check how many characters are in your search query by adding "chars" before or after the query. Try searching for "chars I really like this article" without the quotes and see the results.
duckduckgo_titlecase_1.jpg
7. Checks whether websites are down
If you can't open a website, you might want to check if it is not opening anywhere or just on your computer. You can use websites such as isup.me to check this or you can simply search DuckDuckGo with the keywords.

Also Read Datawind to Launch Rs. 2,000 Android Phone With Free Lifetime Internet

duckduckgo_isitdown.jpg
8. Does mime rhyme with time
You read that right. DuckDuckGo also has an instant answer that finds rhyming words. Search any word you can think of. You'll see an instant answer with rhyming words, from RhymeBrain.
duckduckgo_rhyme.jpg
9. Calendar
Google and DuckDuckGo can show you the current date and time. But DuckDuckGo goes one step further by supporting calendar as an instant answer. Search "calendar" to see one, with the current date highlighted. It can also show you the calendar for any month and year. Try searching for "calendar january 1899".
duckduckgo_calendar.jpg
10. Loan calculator
Another useful DuckDuckGo instant answer is a loan calculator. It's useful if you want to see how much your monthly installments will be and how much interest you'll be paying in total. The search query for this is a little hard to remember, like the terms and conditions for most loan agreements. It is "loan AMOUNT at INTEREST with PERCENT down for DURATION". All the uppercase words are what you need to key in - total amount, interest rate, down payment percentage and the duration of the loan. We tried "loan Rs 50,00,000 at 4.5% with 25% down for 15 years" to get the answer in the picture below.
duckduckgo_loan.jpg
11. Cool features for developers
There are several instant answers that will be useful to software developers, but might be less important for the general public. Here's a quick list of what DuckDuckGo can do:
duckduckgo_html.jpg
12. Add instant answers to other search engines
If you like all these instant answers but don't want to leave your favourite search engine, just download the DuckDuckGo extension on Chrome, Safari or Firefox. Now whenever you search, you'll see DuckDuckGo's instant answers above search results in any search engine.
Bonus
There are several other instant answers on DuckDuckGo that are quite cool, but not very useful. That's why these are included as a bonus in this article. Here's a quick list of some of the best we could find.
duckduckgo_ascii.jpg
These were the best instant answers we could find on DuckDuckGo and none of those are available on Google.


Source: http://gadgets.ndtv.com/

Also Read How to Download and Install iOS 8 on Your iPhone, iPad, or iPod Touch

NOTE: Feel Free To Comment....

Posted in: , , Read Complete Article»

Friday, 12 September 2014

4.93 million Gmail accounts hacked. Check if yours is Safe!

gmail-security-checklist

Also Read How to Edit PDF Files for Free on (Almost) Any Platform?

Everyone are much familiar about Gmail which is free Email Service  Provided by Google. The idea for Gmail was pitched byRajen Sheth during an interview with Google, and went on to be developed by Paul Buchheit several years before it was announced to the public. Initially the email client was available for use only by Google employees internally. Gmail was announced to the public by Google on April 1, 2004.
Most of the people in the world possess Gmail account and use for accessing all the basic websites like Facebook , Twitter etc. Even it is more familiar to companies who keep all the account details, transaction details, passwords etc. They want all these details to be very safe so that no one can access. People may even have fear of losing password or getting hacked by someone.

To over come these problems we need to Secure Gmail accounts.

When the Web started we don’t have any special browsers like Firefox, Google chrome, Opera etc to secure our accounts. But now we have Google Chrome which provides special extensions and Plugins to secure.This extensions and plugins supports encryption and decryption for  confidential mail very well once you send it to target mail Id.
One of the plugin / encryption tool which people not much familiar is “Secure Gmail”. Install the plugin/extension on your Google Chrome Browser.

Steps for Encryption and Decryption :

1.When you sent any email before reaching the server it Encrypts.
2.Its will store the data in encryption format in the server.
3.When recipient who received the message

Also Read Apple Unveils 'Apple Pay' Mobile Wallet and Payment System

F85R6A7FHX0Z2SL.LARGE_

How Secure Gmail works  :

  • Just open Gmail account by entering your Mail id and Password, then you will be able to see compose mail Button on left panel . Beside it  you will able to see  security  option as shown below(shown in arrow).
After which new mail box opens(test email) , in different Format (Secured Format).Just type the mail id to whom you want to send the details , subject and body text.  And send  “Send Encrypted” As shown in screen shot.
2014_09_06_15_02_07_Inbox_68_donald.sarkprojects_gmail.com_Gmail
  • Once you click “Send Encrypted” button , automatically a new  page appears  i.e Encrypt Message, which asks you  security password which you want to keep to protect from  unauthorized access and  hint input(clue of password). The password which your going to provide s,hould be disclosed with your Recipient by verbal or Hint. Once you enter the prompted questions , just click on  “Encrypt and Send” as shown below.
2014_09_06_15_02_30_Inbox_68_donald.sarkprojects_gmail.com_Gmail-e1410181536159
If unauthorized person tries to open the mail it cannot be readable. It requires decryption to read the message under the browser Chrome. If unwuthourized person reads it,It looks as the below image.
encrypted image
Suddenly new pop-up will come , which asks for Decryption Password  which is same as provided by Sender during Encryption.Then one message will be displayed, Followed by  message “Message Successfully Decrypted”.
So thus by Using this Plugin One Can secure Mails and all personal information.


Also Read Everything You Need to Know About the Apple Watch

NOTE: Feel Free To comment....
Unknown  /  at  12:32  /  No comments

gmail-security-checklist

Also Read How to Edit PDF Files for Free on (Almost) Any Platform?

Everyone are much familiar about Gmail which is free Email Service  Provided by Google. The idea for Gmail was pitched byRajen Sheth during an interview with Google, and went on to be developed by Paul Buchheit several years before it was announced to the public. Initially the email client was available for use only by Google employees internally. Gmail was announced to the public by Google on April 1, 2004.
Most of the people in the world possess Gmail account and use for accessing all the basic websites like Facebook , Twitter etc. Even it is more familiar to companies who keep all the account details, transaction details, passwords etc. They want all these details to be very safe so that no one can access. People may even have fear of losing password or getting hacked by someone.

To over come these problems we need to Secure Gmail accounts.

When the Web started we don’t have any special browsers like Firefox, Google chrome, Opera etc to secure our accounts. But now we have Google Chrome which provides special extensions and Plugins to secure.This extensions and plugins supports encryption and decryption for  confidential mail very well once you send it to target mail Id.
One of the plugin / encryption tool which people not much familiar is “Secure Gmail”. Install the plugin/extension on your Google Chrome Browser.

Steps for Encryption and Decryption :

1.When you sent any email before reaching the server it Encrypts.
2.Its will store the data in encryption format in the server.
3.When recipient who received the message

Also Read Apple Unveils 'Apple Pay' Mobile Wallet and Payment System

F85R6A7FHX0Z2SL.LARGE_

How Secure Gmail works  :

  • Just open Gmail account by entering your Mail id and Password, then you will be able to see compose mail Button on left panel . Beside it  you will able to see  security  option as shown below(shown in arrow).
After which new mail box opens(test email) , in different Format (Secured Format).Just type the mail id to whom you want to send the details , subject and body text.  And send  “Send Encrypted” As shown in screen shot.
2014_09_06_15_02_07_Inbox_68_donald.sarkprojects_gmail.com_Gmail
  • Once you click “Send Encrypted” button , automatically a new  page appears  i.e Encrypt Message, which asks you  security password which you want to keep to protect from  unauthorized access and  hint input(clue of password). The password which your going to provide s,hould be disclosed with your Recipient by verbal or Hint. Once you enter the prompted questions , just click on  “Encrypt and Send” as shown below.
2014_09_06_15_02_30_Inbox_68_donald.sarkprojects_gmail.com_Gmail-e1410181536159
If unauthorized person tries to open the mail it cannot be readable. It requires decryption to read the message under the browser Chrome. If unwuthourized person reads it,It looks as the below image.
encrypted image
Suddenly new pop-up will come , which asks for Decryption Password  which is same as provided by Sender during Encryption.Then one message will be displayed, Followed by  message “Message Successfully Decrypted”.
So thus by Using this Plugin One Can secure Mails and all personal information.


Also Read Everything You Need to Know About the Apple Watch

NOTE: Feel Free To comment....

Posted in: , , Read Complete Article»

Wednesday, 20 August 2014

How to Automatically Forward Gmail Emails to Other Email Account?


Also Read How to Uninstall Linux from Windows 8 Dual Boot?

Google’s email service Gmail comes with a useful feature allowing its users to easily forward all your Gmail emails to other Email account automatically. The best thing about this feature is that it is not only limited to Gmail to Gmail users, but you can forward Gmail Emails to other Email service provider accounts including Yahoo, Hotmail etc.
This feature comes in handy when you have multiple Email accounts on Gmail, but don’t want to log in to every account just to check an email. With auto forwarding feature, you can forward all your Emails from different Gmail accounts to your primary email account.Follow these steps to know how to forward Gmail emails to other Email accounts automatically.

    How to Auto-Forward Gmail Email to Other  Email Account

    Step 1: Login to your Gmail account from which you want to forward Emails.
    Step 2: Click on Gear/Setting icon (top right).
    gmail-grant-access-settings-gear-icon
    Step 3: Select Settings from the drop down list.
    gmail-grant-access-settings
    Step 4: Now click on Forwarding and POP/IMAP tab from Settings menu.
    Step 5: Next, click on Add a forwarding address button.
    auto-forward-gmail-email-add

    Also Read 10 Tips to Make your Android Phone Run Faster & Smoother

    Step 6: Now a pop up window will appear. Enter your primary email account address to which you want to receive your forwarded emails.
    Step 7: Once you enter your email address click on Next and then on Proceed to confirm forwarding address.
    Step 8: Click on OK.
    auto-forward-gmail-email-confirmation
    Step 9: Now log in to your primary Gmail account (of which you have entered the email address).
    Step 10: Check your inbox or update tab to find Gmail forwarding confirmation email with a activation link.
    Step 11: Click on the confirmation link and you will see a confirmation success message.
    Step 12: Now go back to your Gmail accounts Settings > Forwarding and POP/IMAP tab.
    Step 13: If you see Verify button click on it. (Don’t worry if you don’t see it)
    Step 14: In Forwarding section, make sure that “Forward a copy of incoming mail to” is selected.
    auto-forward-gmail-email-select
    Step 15: Click on save changes to save the settings.
    All set? If you have followed every step correctly then all your new Emails will be forwarded to your primary Gmail account or other email account.


    Source: http://www.techswatch.com/

    Also Read 5 Tips for Samsung Galaxy S5 Users to Run Faster

    NOTE: Feel Free To Comment.....
    Unknown  /  at  18:37  /  No comments


    Also Read How to Uninstall Linux from Windows 8 Dual Boot?

    Google’s email service Gmail comes with a useful feature allowing its users to easily forward all your Gmail emails to other Email account automatically. The best thing about this feature is that it is not only limited to Gmail to Gmail users, but you can forward Gmail Emails to other Email service provider accounts including Yahoo, Hotmail etc.
    This feature comes in handy when you have multiple Email accounts on Gmail, but don’t want to log in to every account just to check an email. With auto forwarding feature, you can forward all your Emails from different Gmail accounts to your primary email account.Follow these steps to know how to forward Gmail emails to other Email accounts automatically.

      How to Auto-Forward Gmail Email to Other  Email Account

      Step 1: Login to your Gmail account from which you want to forward Emails.
      Step 2: Click on Gear/Setting icon (top right).
      gmail-grant-access-settings-gear-icon
      Step 3: Select Settings from the drop down list.
      gmail-grant-access-settings
      Step 4: Now click on Forwarding and POP/IMAP tab from Settings menu.
      Step 5: Next, click on Add a forwarding address button.
      auto-forward-gmail-email-add

      Also Read 10 Tips to Make your Android Phone Run Faster & Smoother

      Step 6: Now a pop up window will appear. Enter your primary email account address to which you want to receive your forwarded emails.
      Step 7: Once you enter your email address click on Next and then on Proceed to confirm forwarding address.
      Step 8: Click on OK.
      auto-forward-gmail-email-confirmation
      Step 9: Now log in to your primary Gmail account (of which you have entered the email address).
      Step 10: Check your inbox or update tab to find Gmail forwarding confirmation email with a activation link.
      Step 11: Click on the confirmation link and you will see a confirmation success message.
      Step 12: Now go back to your Gmail accounts Settings > Forwarding and POP/IMAP tab.
      Step 13: If you see Verify button click on it. (Don’t worry if you don’t see it)
      Step 14: In Forwarding section, make sure that “Forward a copy of incoming mail to” is selected.
      auto-forward-gmail-email-select
      Step 15: Click on save changes to save the settings.
      All set? If you have followed every step correctly then all your new Emails will be forwarded to your primary Gmail account or other email account.


      Source: http://www.techswatch.com/

      Also Read 5 Tips for Samsung Galaxy S5 Users to Run Faster

      NOTE: Feel Free To Comment.....

      Posted in: , Read Complete Article»

      Monday, 11 August 2014

      How to Block Someone on Gmail?

      Gmail_Block_Flickr.jpg

      Also Read How to Turn Off Narrator When Windows Phone is Locked?

      Most people love Gmail, or are at least using the service, but it's not perfect. You can't block people with a single click, unlike on Facebook. If you've simply been getting too many emails from a website, you might be better off looking for an unsubscribe link in the email to stop those mails.
      If you're sure that you're done with mails from that email address, then you can set up a filter to delete the mails on their way to your inbox, with the following steps:
      1. Open Gmail > sign in > click the tiny down arrow (next to the blue search button) on the search bar at the top.
      2. In the From field, type the email address you want to block. You may type a specific email address (xyz@abc.com) or an entire domain (@abc.com) > click Create filter with this search > check Delete it > click Create filter. This will send those emails directly to the trash folder. You won't get any notifications for these emails and they will be deleted forever 30 days later.
      3. If you have an offending email open, you can click the down arrow next to the reply button on the top-right of the message > Filter messages like this. Now follow the instructions in the previous step.
      Gmail doesn't offer a way to let you stop emails from being sent to your email address, so if you want to block emails from certain addresses, the method mentioned above is your best bet.


      Also Read How to Upload Videos to YouTube from Windows Phone 8.1 Smartphone?

      NOTE: Feel Free To Comment....
      Unknown  /  at  18:54  /  No comments

      Gmail_Block_Flickr.jpg

      Also Read How to Turn Off Narrator When Windows Phone is Locked?

      Most people love Gmail, or are at least using the service, but it's not perfect. You can't block people with a single click, unlike on Facebook. If you've simply been getting too many emails from a website, you might be better off looking for an unsubscribe link in the email to stop those mails.
      If you're sure that you're done with mails from that email address, then you can set up a filter to delete the mails on their way to your inbox, with the following steps:
      1. Open Gmail > sign in > click the tiny down arrow (next to the blue search button) on the search bar at the top.
      2. In the From field, type the email address you want to block. You may type a specific email address (xyz@abc.com) or an entire domain (@abc.com) > click Create filter with this search > check Delete it > click Create filter. This will send those emails directly to the trash folder. You won't get any notifications for these emails and they will be deleted forever 30 days later.
      3. If you have an offending email open, you can click the down arrow next to the reply button on the top-right of the message > Filter messages like this. Now follow the instructions in the previous step.
      Gmail doesn't offer a way to let you stop emails from being sent to your email address, so if you want to block emails from certain addresses, the method mentioned above is your best bet.


      Also Read How to Upload Videos to YouTube from Windows Phone 8.1 Smartphone?

      NOTE: Feel Free To Comment....

      Sunday, 27 July 2014

      How to delete all your Facebook messages at once?

      Facebook does not allow you to delete all your messages at once. You have to click on each message thread and delete each of them individually. It might be a daunting task to delete your Facebook messages, especially  if you have several hundreds of messages. Fortunately, there exist a few browser extensions that allow you to select all your sent or archived messages and delete them in one click.

      Also Read Best Laptops Under Rs. 30,000

      Delete all Facebook messages

      Delete Facebook Message under Chrome

      1. If you are a Chrome fan boy, download and install the extension Facebook Fast Delete Messages.
      2. Restart your browser and head up to your Facebook Messages.
      3. You should notice a new button Delete ALL at the top. Clicking on this button will actually delete all your messages at once.
      Delete facebook messages in bulk
      4. If you want to delete message threads individually, you can do so by clicking on the red cross next to each message.
      Delete Facebook message individually in one click

      Delete Facebook Message under Firefox

      For Firefox users, you can use Delete Facebook Messages add-on, which is similar to the one for Chrome. You should see a new button called Delete Messages appear as shown below. In case it is not visible after installing this extension, press CTRL+ F5.
      Delete all Facebook message under Firefox
      That’s all folks. I hope this simple trick might come in handy if in case you want to clear your Facebook messages in bulk. 


      Also Read Dropbox vs Google Drive vs SpiderOak: Which Cloud Storage Is Best For You?

      NOTE: Feel Free To Comment....
      Unknown  /  at  12:26  /  No comments

      Facebook does not allow you to delete all your messages at once. You have to click on each message thread and delete each of them individually. It might be a daunting task to delete your Facebook messages, especially  if you have several hundreds of messages. Fortunately, there exist a few browser extensions that allow you to select all your sent or archived messages and delete them in one click.

      Also Read Best Laptops Under Rs. 30,000

      Delete all Facebook messages

      Delete Facebook Message under Chrome

      1. If you are a Chrome fan boy, download and install the extension Facebook Fast Delete Messages.
      2. Restart your browser and head up to your Facebook Messages.
      3. You should notice a new button Delete ALL at the top. Clicking on this button will actually delete all your messages at once.
      Delete facebook messages in bulk
      4. If you want to delete message threads individually, you can do so by clicking on the red cross next to each message.
      Delete Facebook message individually in one click

      Delete Facebook Message under Firefox

      For Firefox users, you can use Delete Facebook Messages add-on, which is similar to the one for Chrome. You should see a new button called Delete Messages appear as shown below. In case it is not visible after installing this extension, press CTRL+ F5.
      Delete all Facebook message under Firefox
      That’s all folks. I hope this simple trick might come in handy if in case you want to clear your Facebook messages in bulk. 


      Also Read Dropbox vs Google Drive vs SpiderOak: Which Cloud Storage Is Best For You?

      NOTE: Feel Free To Comment....

      Posted in: , , Read Complete Article»

      Tuesday, 22 July 2014

      How to Download and Save Your Facebook, Google and Twitter Profiles?

      Download_Social_Media_Flickr.jpg

      Also Read How to Use Gmail Offline on Google Chrome?How to Use Gmail Offline on Google Chrome?

      If your social media profiles contain countless priceless memories that you aren't ready to part with, then you might want to store a copy offline. The world's most popular social networks let you download all your data, which might also be useful if you're planning to delete your profiles. Downloading these profiles can take a lot of time, depending on how much you've shared, since you may have saved many thousands of photos, so make sure you have some free time when you start this process. With that said, here's how you can go about it.

      Facebook

      The world's most popular social network - Facebook - lets you download your posts, photos and videos you've shared, your messages, chat conversations and information from the About section of your profile. You can download the data easily, but the option is not easy to find. Here's how you can find it.
      2. The last option, under Language, is "Download a copy of your Facebook data." This is written in small font size and it's hard to tell that only "Download a copy" in that sentence is actually a link. Click it.
      3. In the next page, click Start My Archive > click Start My Archive again in the pop-up > enter your password > click Submit.
      4. Facebook will send you an email with a link to a zip file, which you can download and view all your data offline. The data is in an HTML file, which means you can open it in any browser.
      Download_Facebook_data.jpg

      Google

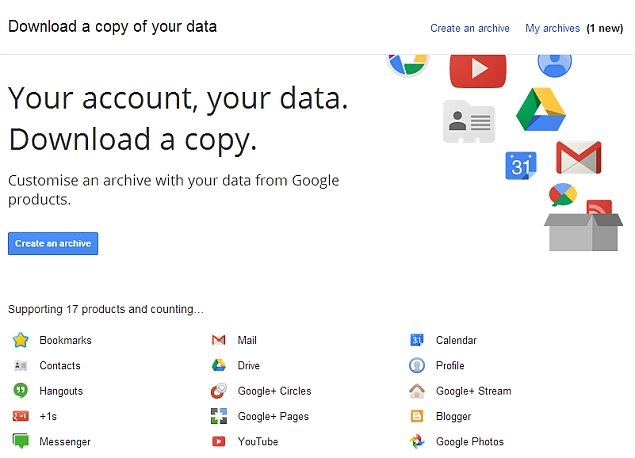
      Google has a tool called Takeout which lets you download all your account data. It supports 17 products at the moment, including Gmail, YouTube, Hangouts and Google+. Downloading your data is pretty straightforward, just follow these steps.
      1. Go to Google Takeout > click Create an archive.
      2. This will open a page where you can select the services from which you want to download your data. By default all services are selected, so uncheck what you don't want. You can also select formats in which you want your data by clicking the Edit button next to each service. For instance, you can select whether you want contacts in vCard or HTML format.
      3. Once you are done with the selection, click the red Create Archive button at the top.
      4. Now Google will start creating an archive of your data and will email you when it is ready. This may take a lot of time, so be patient. When it's done, your data will be available in a zip file.

      Also Read How to Enable Offline Mode in Google Chrome to Work Offline?

      Download_Google_data.jpg

      Twitter

      Downloading Twitter data is a simple process. Twitter will take some time to create an archive of all your tweets, so don't expect instant results. Follow these steps for an offline archive of all your tweets.
      1. Go to Twitter settings.
      2. Scroll down to the bottom of the page and click Request your archive.
      3. Twitter will mail you a link to a zip file when the archive is ready. Your archive is available in three formats - HTML, json and csv.
      Download_Twitter_data.jpg


      Also Read How to Increase Browser Cache memory in Chrome, Internet Explorer and Firefox?

      Source: gadgets.ndtv.com

      NOTE: Feel Free To Comment....
      Unknown  /  at  18:51  /  1 comment

      Download_Social_Media_Flickr.jpg

      Also Read How to Use Gmail Offline on Google Chrome?How to Use Gmail Offline on Google Chrome?

      If your social media profiles contain countless priceless memories that you aren't ready to part with, then you might want to store a copy offline. The world's most popular social networks let you download all your data, which might also be useful if you're planning to delete your profiles. Downloading these profiles can take a lot of time, depending on how much you've shared, since you may have saved many thousands of photos, so make sure you have some free time when you start this process. With that said, here's how you can go about it.

      Facebook

      The world's most popular social network - Facebook - lets you download your posts, photos and videos you've shared, your messages, chat conversations and information from the About section of your profile. You can download the data easily, but the option is not easy to find. Here's how you can find it.
      2. The last option, under Language, is "Download a copy of your Facebook data." This is written in small font size and it's hard to tell that only "Download a copy" in that sentence is actually a link. Click it.
      3. In the next page, click Start My Archive > click Start My Archive again in the pop-up > enter your password > click Submit.
      4. Facebook will send you an email with a link to a zip file, which you can download and view all your data offline. The data is in an HTML file, which means you can open it in any browser.
      Download_Facebook_data.jpg

      Google

      Google has a tool called Takeout which lets you download all your account data. It supports 17 products at the moment, including Gmail, YouTube, Hangouts and Google+. Downloading your data is pretty straightforward, just follow these steps.
      1. Go to Google Takeout > click Create an archive.
      2. This will open a page where you can select the services from which you want to download your data. By default all services are selected, so uncheck what you don't want. You can also select formats in which you want your data by clicking the Edit button next to each service. For instance, you can select whether you want contacts in vCard or HTML format.
      3. Once you are done with the selection, click the red Create Archive button at the top.
      4. Now Google will start creating an archive of your data and will email you when it is ready. This may take a lot of time, so be patient. When it's done, your data will be available in a zip file.

      Also Read How to Enable Offline Mode in Google Chrome to Work Offline?

      Download_Google_data.jpg

      Twitter

      Downloading Twitter data is a simple process. Twitter will take some time to create an archive of all your tweets, so don't expect instant results. Follow these steps for an offline archive of all your tweets.
      1. Go to Twitter settings.
      2. Scroll down to the bottom of the page and click Request your archive.
      3. Twitter will mail you a link to a zip file when the archive is ready. Your archive is available in three formats - HTML, json and csv.
      Download_Twitter_data.jpg


      Also Read How to Increase Browser Cache memory in Chrome, Internet Explorer and Firefox?

      Source: gadgets.ndtv.com

      NOTE: Feel Free To Comment....

      Posted in: , , Read Complete Article»

      Wednesday, 16 July 2014

      How to Increase Browser Cache memory in Chrome, Internet Explorer and Firefox?

      A web browser cache is simply a place designated on your computer where the browser temporarily stores webpage information- such as images and when you revisit the same site the webpage loads faster than the first time visit which is because of the cache of the website stored in your computer’s temporary memory.

      Also Read How to Password Lock Google Play Store on Android Phone and Tablet?

      How to Increase Browser cache memory in chrome, Firefox and Internet Explorer
      Now why we need to increase the browser cache memory? The answer is simple, just to make the webpage load faster. This is one of the various factors which affect your webpage loading speed. So today will see how to increase the cache memory in three most popular browsers namely Google Chrome, Microsoft Internet Explorer and Mozilla Firefox.
      Follow below steps to Increase Cache memory in Internet Explorer.

      Also Read How to Download Your Orkut Scraps, Testimonials, and Photos

      1. Open Internet Explorer
      2. Click Tool icon (Gear icon upper right of the browser)
      3. Now Select Internet Option
      4. Below in Browsing History and click on Setting
      5. Now a windows will appear
      6. In Temporary Internet Files select automatically and write the size of memory you want to allocate at least 256 (1= 1MB) or more if you have lots of free storage.
      7. Click OK and save your changes than click OK/Apply again to close the windows.
      Follow below steps to Increase Cache memory in Mozilla Firefox.
      1. Open Firefox
      2. Click on Tools >> Options >> Advanced 
      3. In Cache Web Content select Override automatic cache management
      4. write the size of memory you want to allocate at least 256(1=1MB)
      5. Now click on OK to save the setting
      Follow below steps to Increase Cache memory in Google Chrome.
      • Right Click on the Google Chrome icon in desktop
      • Select properties
      • Properties >> Shortcut Tab
      • Below find Target and click inside the box
      • Now press “ End” key in keyboard
      • Now copy and paste the this at the end: –disk-cache-size-1000000
      • Click OK to save the setting.
      So this was about how you can increase the cache size in Google Chrome, Firefox and Internet explorer.


      Also Read How To Clear Your Private Browsing Data in Firefox

      NOTE: Feel Free To Comment....
      Unknown  /  at  12:36  /  No comments

      A web browser cache is simply a place designated on your computer where the browser temporarily stores webpage information- such as images and when you revisit the same site the webpage loads faster than the first time visit which is because of the cache of the website stored in your computer’s temporary memory.

      Also Read How to Password Lock Google Play Store on Android Phone and Tablet?

      How to Increase Browser cache memory in chrome, Firefox and Internet Explorer
      Now why we need to increase the browser cache memory? The answer is simple, just to make the webpage load faster. This is one of the various factors which affect your webpage loading speed. So today will see how to increase the cache memory in three most popular browsers namely Google Chrome, Microsoft Internet Explorer and Mozilla Firefox.
      Follow below steps to Increase Cache memory in Internet Explorer.

      Also Read How to Download Your Orkut Scraps, Testimonials, and Photos

      1. Open Internet Explorer
      2. Click Tool icon (Gear icon upper right of the browser)
      3. Now Select Internet Option
      4. Below in Browsing History and click on Setting
      5. Now a windows will appear
      6. In Temporary Internet Files select automatically and write the size of memory you want to allocate at least 256 (1= 1MB) or more if you have lots of free storage.
      7. Click OK and save your changes than click OK/Apply again to close the windows.
      Follow below steps to Increase Cache memory in Mozilla Firefox.
      1. Open Firefox
      2. Click on Tools >> Options >> Advanced 
      3. In Cache Web Content select Override automatic cache management
      4. write the size of memory you want to allocate at least 256(1=1MB)
      5. Now click on OK to save the setting
      Follow below steps to Increase Cache memory in Google Chrome.
      • Right Click on the Google Chrome icon in desktop
      • Select properties
      • Properties >> Shortcut Tab
      • Below find Target and click inside the box
      • Now press “ End” key in keyboard
      • Now copy and paste the this at the end: –disk-cache-size-1000000
      • Click OK to save the setting.
      So this was about how you can increase the cache size in Google Chrome, Firefox and Internet explorer.


      Also Read How To Clear Your Private Browsing Data in Firefox

      NOTE: Feel Free To Comment....

      Posted in: , Read Complete Article»

      Saturday, 12 July 2014

      How To Clear Your Private Browsing Data in Firefox

      Email services which are Web-based, take great precautions to ensure that only you can see your messages. They do this by many means; you may have to enter your password every time you check your mail or you may be forced to log off automatically after a period of time.  But, you can also have a say in how your own security is managed.

      Also Read How to Download Your Orkut Scraps, Testimonials, and Photos

      It is sensible to empty your browser’s cache of visited web pages and your passwords as well as clearing the browsing history or cookies, if you use a web-based email service from a public computer. If you don’t clear your private data, another person that is using the same computer you did, may be able to see some of your private data.
      Take control of your data.
      Removing your Private Data, Emptying your Cache and Removing your Cookies will help keep your data safe.

      Download Firefox Latest Version From here....

      To delete your personal cookies, browsing history, cached web pages or passwords and other personal data after using a web-based email service using Mozilla‘s Firefox’s browser:
      1) Select Tools/Clear Private Data from the menu.
      2) Make sure Browsing History, Saved Form and Search History, Cache, Cookies, Saved Passwords and Authenticated Sessions tick boxes are checked.
      3) Click Clear Private Data Now.
      4) Close Mozilla Firefox.
      If you want to clear your private data automatically when you exit Firefox, complete the following:
      1) Select Tools/Options from the menu.
      2) Go to the Privacy tab.
      3) Make sure the ‘Always clear my private data when I close Firefox’ check box is ticked.
      4) Click Settings
      5) Choose the data that you want erasing and click OK.
      6) Close the configuration dialog.
      Now the next time you browse the Internet with Firefox your private data will be automatically erased.


      Also Read Micromax A190 With Hexa-Core Processor Leaked in Press Renders

      NOTE: Feel Free To Comment....
      Unknown  /  at  16:37  /  No comments

      Email services which are Web-based, take great precautions to ensure that only you can see your messages. They do this by many means; you may have to enter your password every time you check your mail or you may be forced to log off automatically after a period of time.  But, you can also have a say in how your own security is managed.

      Also Read How to Download Your Orkut Scraps, Testimonials, and Photos

      It is sensible to empty your browser’s cache of visited web pages and your passwords as well as clearing the browsing history or cookies, if you use a web-based email service from a public computer. If you don’t clear your private data, another person that is using the same computer you did, may be able to see some of your private data.
      Take control of your data.
      Removing your Private Data, Emptying your Cache and Removing your Cookies will help keep your data safe.

      Download Firefox Latest Version From here....

      To delete your personal cookies, browsing history, cached web pages or passwords and other personal data after using a web-based email service using Mozilla‘s Firefox’s browser:
      1) Select Tools/Clear Private Data from the menu.
      2) Make sure Browsing History, Saved Form and Search History, Cache, Cookies, Saved Passwords and Authenticated Sessions tick boxes are checked.
      3) Click Clear Private Data Now.
      4) Close Mozilla Firefox.
      If you want to clear your private data automatically when you exit Firefox, complete the following:
      1) Select Tools/Options from the menu.
      2) Go to the Privacy tab.
      3) Make sure the ‘Always clear my private data when I close Firefox’ check box is ticked.
      4) Click Settings
      5) Choose the data that you want erasing and click OK.
      6) Close the configuration dialog.
      Now the next time you browse the Internet with Firefox your private data will be automatically erased.


      Also Read Micromax A190 With Hexa-Core Processor Leaked in Press Renders

      NOTE: Feel Free To Comment....

      Posted in: , Read Complete Article»

      About

      This blog belong to all our youngster friendz, who believe in sharing their knowledge with others and want to try to hackin', crackin' , full version applications at free of cost.
      you will found here valuable stuffs.

      Labels

      adf.ly blocked (1) android (109) Android and PC (19) android games (11) android news (3) android tricks (43) Antivirus (11) Anvsoft (1) apple (40) asha phones (1) avast (1) avast pro antivirus 8 2013 (1) avg (1) AVG pc tuneup 2013 full version (1) avira (1) blackberry (1) blogspot (2) body_language (1) bootable usb (1) Browsers (16) c cleaner pro + business (1) Cheatbook 2013 (1) Chetan Bhagat (1) compressor (1) crac (1) Crack (1) crack + keygen (2) cyberlink power2go full version (1) daemon tools 5.2 full version (1) daemon tools patch (1) defender (2) dictionary (1) direct link (1) DivX Pro 7 (1) Ebook (2) eset (1) etc (1) facebook (16) Firewall (2) free recharge tricks (1) free sms (1) FRUIT NINJA for windows full version (1) full version (8) Full Version MS Office 13 (1) GTA Sandreas (1) hack (4) hack pc (3) hacking using keylogger (1) hardware (1) hiDownload platinum 8 (1) how to (6) how to install .net (1) HTML (1) idm (1) idm crack (1) IDM full version (1) image editor (2) install .net in windows 8 (1) internet tricks (37) iPhone 5c (2) job (1) k j activator (1) kaspersky (2) keygen (2) leaked images (1) license key (1) manual updates (1) mediafire (1) MEDIAFIRE DOWNLOAD (2) mediafire link (2) mobiles (42) music player (1) nfs most wanted (1) Office 13 Activator (1) official site update (1) offline updates (1) patch (4) PC (3) pc customize (1) PC Drivers (2) pc games (15) pc games cheats (11) PC Software (152) PC tricks (146) PdaNET 3.50 (1) PDF (3) phone specifications (43) pic viewer (3) power iso 5.6 (1) premium zbigz account (1) problem with .net in windows 8 (1) review (11) reviews (2) Revolution 2020 PDF (1) science (2) sharebeast download (6) sharebeast link (2) symbian mobiles (2) tech knowledge (33) Tech News (343) tech reviews (146) Torrent To IDM (1) Tune-Up 2014 Full Version (1) Ubuntu Mobiles (1) video player (13) video tutorial (1) Web design (1) window 8.1 tricks (12) windows 8 activator (1) Windows 8 USB Installer Maker (1) windows phones (16) winrar 5 full version (1)
      Copyright © 2014 SimplyGet. WP Theme-junkie converted by Bloggertheme9
      Blogger templates. Proudly Powered by Blogger.