
Nude photos of Jennifer Lawrence and other celebrities began circulating across the Internet on Sunday, with some reports blaming Apple's iCloud service that can automatically backup user photos and keep them long after they are deleted from user's phone.
If you're using iCloud, you might be worried about the pictures backed up there from your phone - regardless of the content of the pictures, nobody wants their personal photographs stolen.
As of now, it isn't clear whether it is an iCloud hack or if the photos were accessed through other vulnerabilities. Both FBI and Apple are investigating this incident and we will have more information once the investigations conclude. These steps will prevent your photos from automatically being uploaded to Apple's iCloud.
Turn off auto-upload and delete photos from iCloud
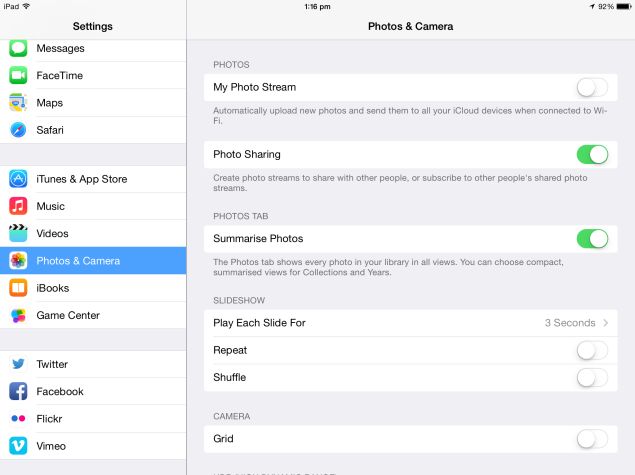
If you have an iPhone or iPad, all your photos are being uploaded to iCloud by default. Most people don't even realise that all their photos are being stored on iCloud servers. A quick way to check is by opening the Photos app and open the Albums view. All the photos in the album My Photo Stream are stored online. Here's how you can stop them being uploaded there.
If you have an iPhone or iPad, all your photos are being uploaded to iCloud by default. Most people don't even realise that all their photos are being stored on iCloud servers. A quick way to check is by opening the Photos app and open the Albums view. All the photos in the album My Photo Stream are stored online. Here's how you can stop them being uploaded there.
1. On your iPhone and iPad, do this: Settings > Photos & Camera > My Photo Stream > Off. Now you'll see a warning "Turning off Photo Stream will delete all Photo Stream photos from your iPhone". Tap Delete and the photos in the My Photo Stream album will be removed. This doesn't affect photos stored locally on your device or other shared photo streams.
2. Mac users can do the same by going to System Preferences > iCloud > uncheck Photos.
If you want to keep auto-upload on, but just want to delete some photos from your iCloud account, open Photos > Albums > My Photo Stream > tap Select and pick the photos you don't want to store online > tap the trash can at the bottom right.
Stronger passwords
We've been strong advocates of using strong passwords and different passwords for different accounts. If you still have a weak iCloud password, change it to a stronger one with uppercase, lowercase characters, numbers and symbols. Here's how.
We've been strong advocates of using strong passwords and different passwords for different accounts. If you still have a weak iCloud password, change it to a stronger one with uppercase, lowercase characters, numbers and symbols. Here's how.
1. Open the Apple ID page on Apple's website. Sign in and answer the two security questions. Now click Change password.
2. On iOS devices, open the App Store and scroll to the bottom. Tap Apple ID > Apple ID > enter password and Sign in > tap Password to key in your new password and tap Verify to type it again. Tap Done to complete the process.
Two Factor Authentication
We also recommend that you use two-factor authentication for your Apple ID, which sends you a code via text message or an associated Find My iPhone app every time you log in. Unless you enter this code, you won't be able to log in - even if they are able to guess or hack your password. This means that to access your account, people need to know your username, your password, and also have physical possession of your phone - it's a little inconvenient, but adds a lot of security. You can set this up through the Apple ID page.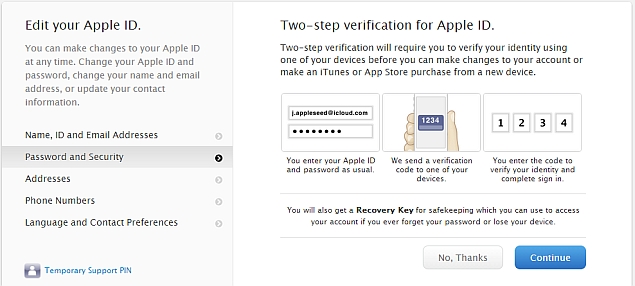
1. Open the Apple ID page on Apple's website. Sign in and answer the two security questions. Now click 'Get Started' near the top to enable two-factor authentication.
2. Follow the on-screen instructions to save your phone details.
These steps should help you protect your iCloud photos from unauthorised access.
Also Read How to Automatically Forward Gmail Emails to Other Email Account?
NOTE: Feel Free To Comment....


0 comments: